Dewclaw Drama! The Painless Way to Train Your Puppy for Easy Nail Trims Every Time
The Great Paw Tussle: Why Nail Trims Don’t Have to Be a Battle
We have all been there. You pull out the clippers, and suddenly your sweet, cuddly puppy transforms into a wiggly, slippery eel or, worse, a tiny, furry version of a dramatic opera singer. The ‘Dewclaw Drama’ is real, and for many savvy dog owners, it is the one grooming task that brings on a wave of anxiety. But here is the secret: nail trims don’t have to be a traumatic event for you or your pup. In fact, with the right approach rooted in cooperative care, you can turn this chore into a bonding experience that your dog actually participates in willingly.
As a canine specialist, I have seen the long-term effects of forced nail trims: cracked nails, bleeding quicks, and dogs that develop a lifelong fear of being touched. We are going to change that narrative today. By focusing on desensitization, positive reinforcement, and a deep understanding of canine anatomy, we will build a foundation of trust. This guide is designed to take you through the painless way to train your puppy, ensuring that those tricky dewclaws and standard nails are kept short without a single tear or yelp. Let’s dive into the world of stress-free grooming and turn your puppy into a pro.
Understanding the Anatomy: What is a Dewclaw Anyway?
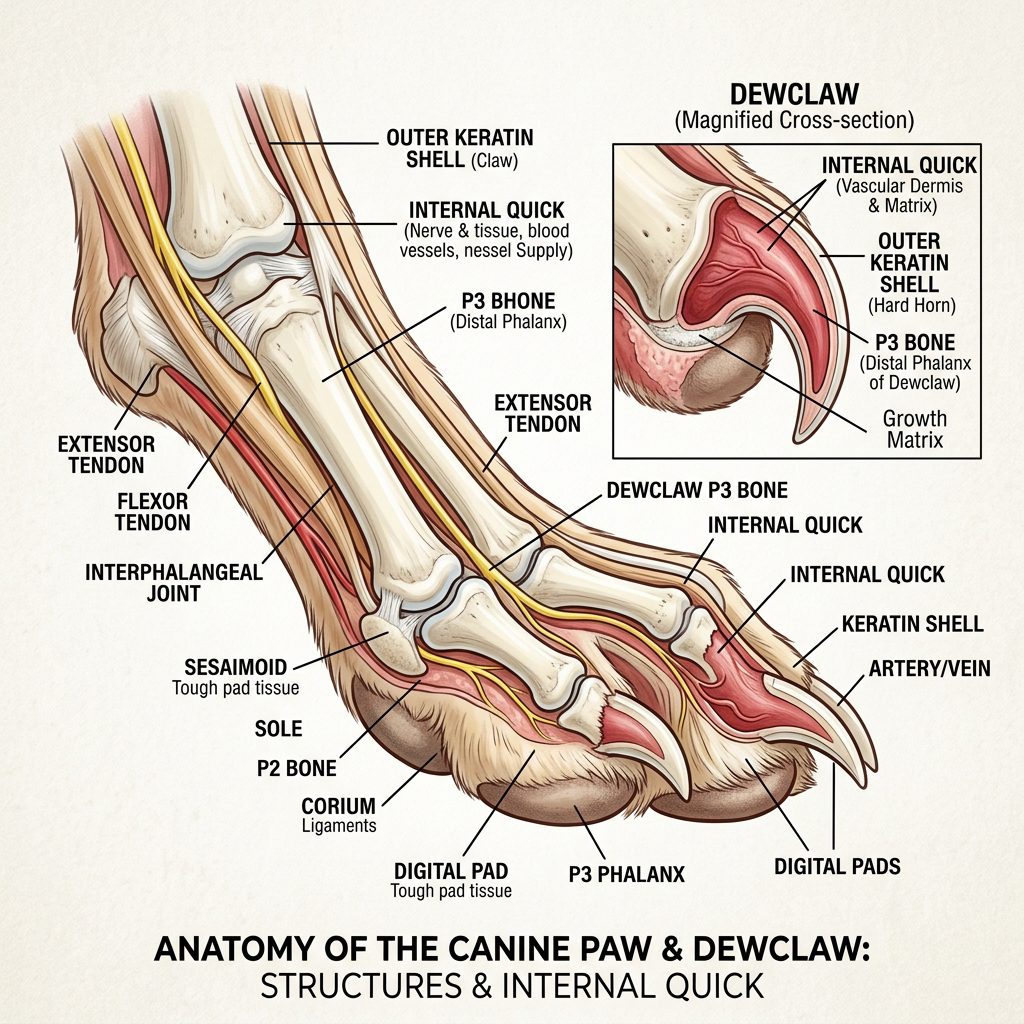
Before we pick up the tools, we need to understand what we are working with. Most dogs have four nails on each hind paw and five on each front paw. That fifth nail, located slightly higher up on the inner side of the leg, is the dewclaw. Think of it like a dog’s thumb, though in many breeds, it doesn’t have the same range of motion as ours. Some dogs even have double dewclaws on their back legs!
The reason dewclaws cause so much ‘drama’ is twofold. First, they don’t touch the ground when the dog walks, meaning they don’t get naturally filed down by pavement or hard surfaces. This causes them to grow in a sharp, curved hook that can get snagged on carpets, upholstery, or brush. Second, because they are positioned higher up, the bone and ligament structure can feel a bit ‘floppy’ to the touch, which can be unsettling for a puppy who isn’t used to the sensation. Understanding the internal structure of the nail is vital to avoiding pain.
| Nail Component | Description | Sensitivity Level |
|---|---|---|
| The Shell | The hard outer layer made of keratin. | Low (No nerves) |
| The Quick | The living center containing blood vessels and nerves. | Extreme (Very painful if cut) |
| The Sole Horn | The softer underside of the nail. | Moderate |
| Dewclaw Ligament | The tissue attaching the dewclaw to the leg. | High (Sensitive to pulling) |
The ‘Quick’ is the part we all fear. In white nails, it is the pink area you can see through the shell. In black nails, it is hidden, making the task a bit more like a guessing game. Our goal is to trim the shell without ever touching the quick. When we train a puppy, we aren’t just training them to sit still; we are training their nervous system to remain calm while we navigate these sensitive zones.
The Groomer’s Arsenal: Choosing the Right Tools
Using the wrong tool is a one-way ticket to a bad experience. If your clippers are dull, they will crush the nail rather than slicing through it, which causes a sharp pinch that can make a puppy jump. For savvy owners, I recommend having a variety of tools to see what your specific puppy prefers. Some dogs hate the ‘snip’ sound of clippers but don’t mind the hum of a grinder.
Clippers vs. Grinders
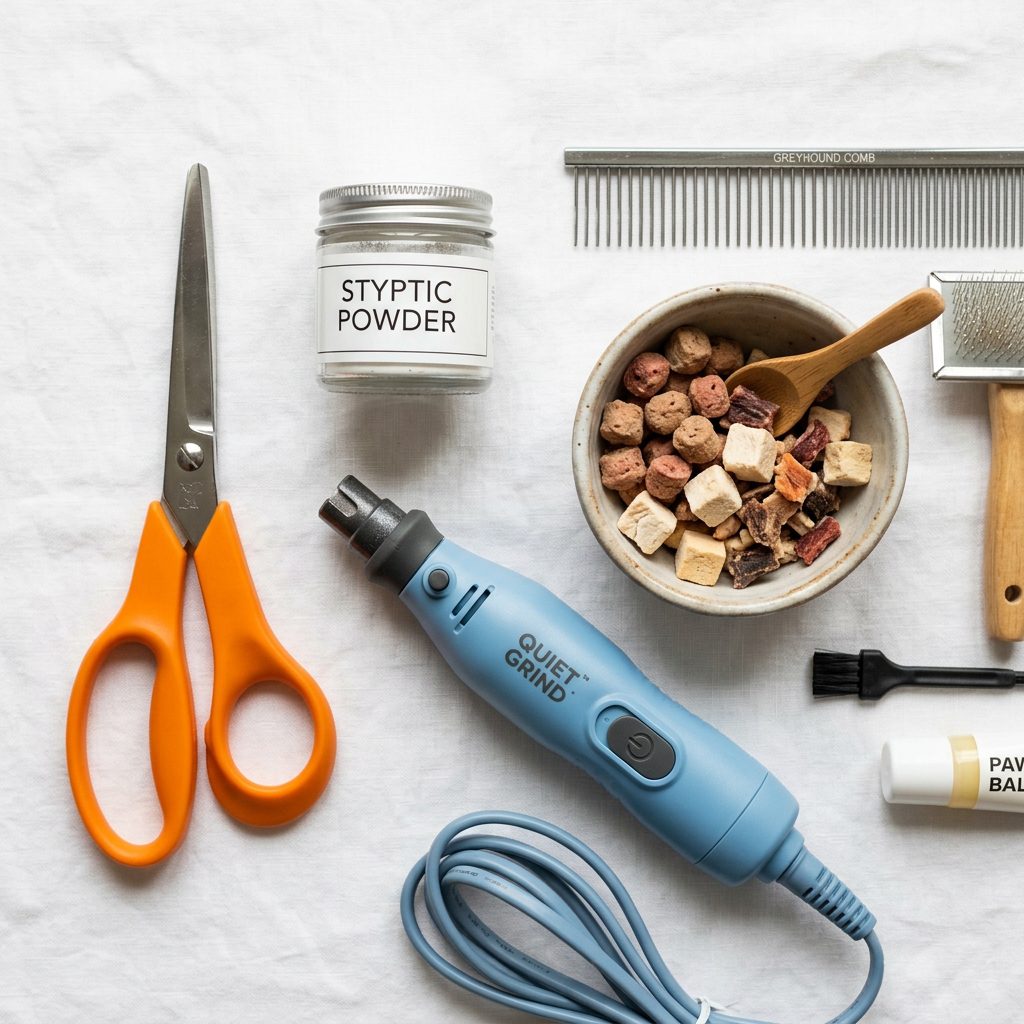
There are two main camps in the nail-trimming world: the clippers and the grinders. Clippers come in two styles: Guillotine (where a blade slides up) and Scissor/Pliers (where two blades meet). For puppies, I almost always recommend the scissor-style clippers with a safety guard. They offer more control and are less likely to slip on those tiny, sharp puppy nails.
| Tool Type | Pros | Cons |
|---|---|---|
| Scissor Clippers | Quiet, fast, great for thick nails. | Risk of cutting the quick if not careful. |
| Guillotine Clippers | Easy to replace blades. | Can crush the nail; harder to see the quick. |
| Electric Grinder (Dremel) | Smooth finish, less risk of bleeding. | Noisy, vibrates, can get hot. |
| Manual Nail File | Zero noise, very safe. | Takes a long time; only for minor maintenance. |
Regardless of the tool, you MUST have styptic powder on hand. Even the most experienced pros occasionally ‘quick’ a dog. Styptic powder (like Kwik Stop) acts as a clotting agent to stop bleeding instantly. Pro Tip: If you don’t have styptic powder in an emergency, cornstarch or flour can work in a pinch, though they aren’t as effective at numbing the site.
Expert Tip: Always check the sharpness of your clippers. If they feel like they are resisting the cut, it is time to replace the blades or sharpen them. A clean cut is a painless cut!
The Step-by-Step Cooperative Care Roadmap
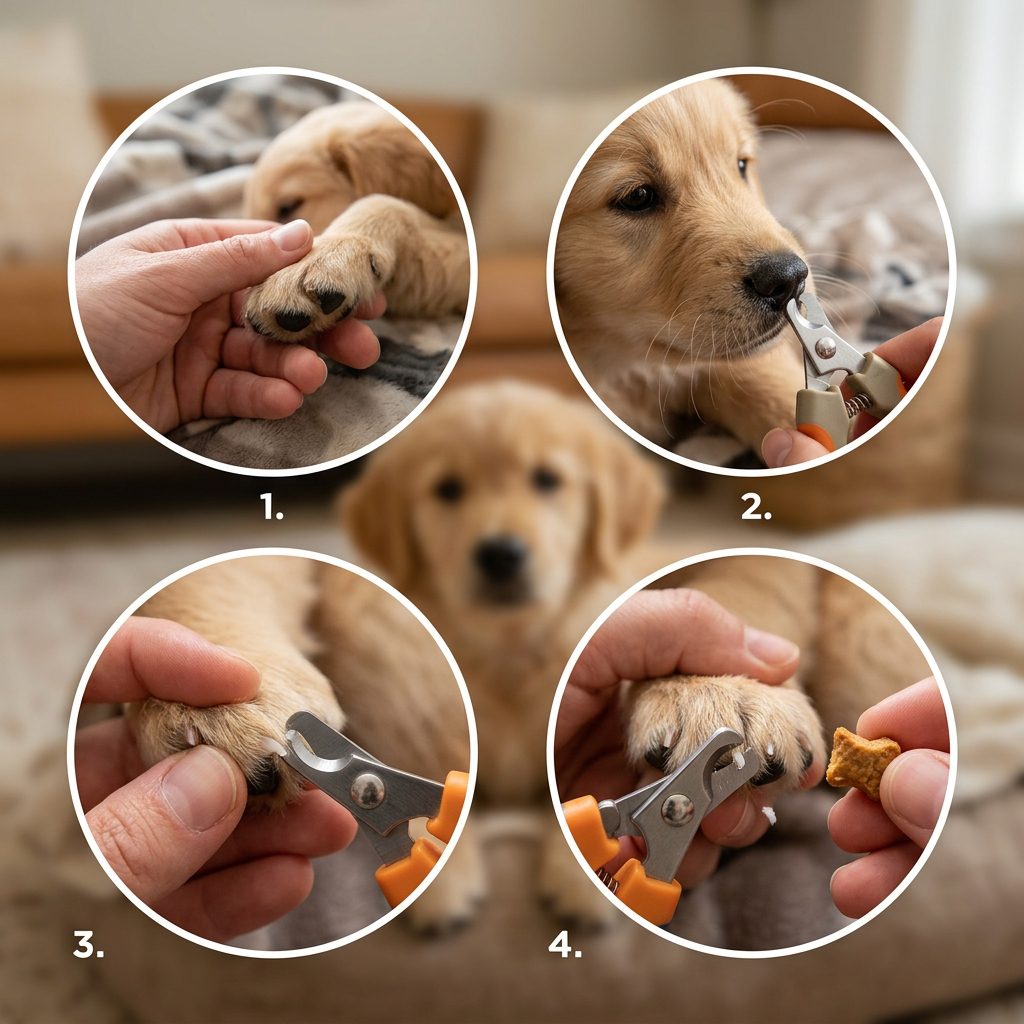
Training a puppy for nail trims is a marathon, not a sprint. We use a method called Systematic Desensitization and Counter-Conditioning. This means we slowly introduce the stimulus (the clippers) at a level the puppy can handle while pairing it with something they love (like peanut butter or chicken).
Step 1: The ‘Magic Touch’ (Days 1-3)
Don’t even bring out the clippers yet. Your puppy needs to learn that paw handling equals rewards. Gently touch your puppy’s shoulder, then slide your hand down to their paw. Give a treat. Repeat. Gradually work your way to holding the paw for one second, then two, then five. If they pull away, you’ve gone too fast. Crucial: Specifically practice lifting the dewclaw slightly away from the leg, as this is the most ‘unusual’ sensation for them.
Step 2: Introduction of the Tool (Days 4-6)
Show the puppy the clippers. Let them sniff them. Treat. Open and close the clippers so they hear the ‘click’ sound, but don’t go near the paw. Treat. If using a grinder, turn it on in the other room, then gradually bring it closer over several sessions. We want the sound of the tool to become a ‘dinner bell’ that predicts yummy snacks.
Step 3: The ‘Touch and Treat’ (Days 7-10)
Now, combine the two. Touch the cold metal of the clippers to the puppy’s nail, but do not cut. Just touch and treat. This desensitizes them to the sensation of the tool against their body. Do this for every single nail, including the dewclaws.
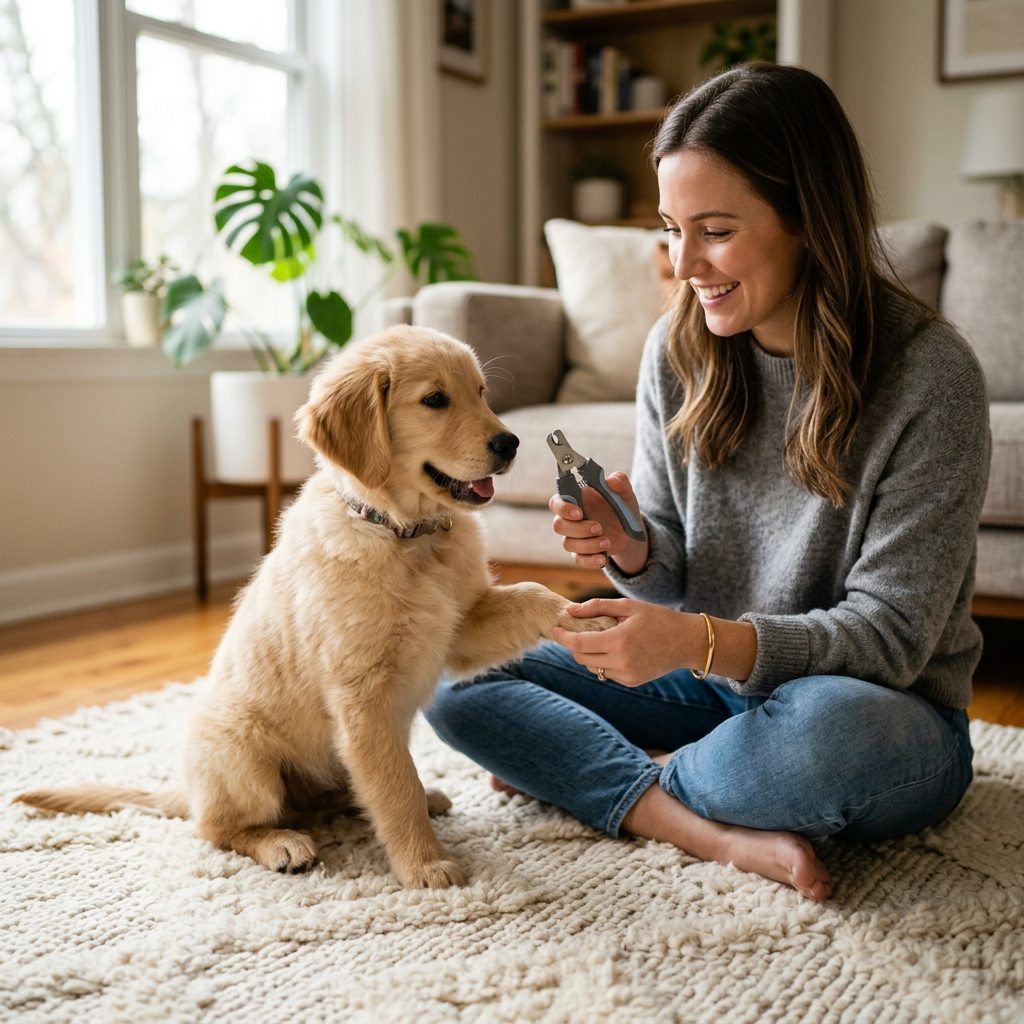
Step 4: The First Snip (Day 11+)
We are finally ready. Take just the very tip—the tiny ‘hook’—off one single nail. Just one! Then, have a party. Give a massive reward and stop for the day. Tomorrow, do two nails. By building up slowly, you prevent the ‘over-threshold’ response that leads to struggling.
“The goal isn’t to get the nails done; the goal is to keep the puppy comfortable. If you only get one nail done today but the puppy stayed relaxed, that is a massive win.”
Troubleshooting the Drama: What to Do When Things Go South
Even with the best training, puppies have off days. Maybe they are teething, or maybe they have too much ‘zoomie’ energy. If your puppy starts to vocalize or struggle, do not force the issue. Forcing a puppy to endure a nail trim teaches them that they have no control, which often leads to aggression or extreme fear in adulthood.
Handling the ‘Puppy Scream’
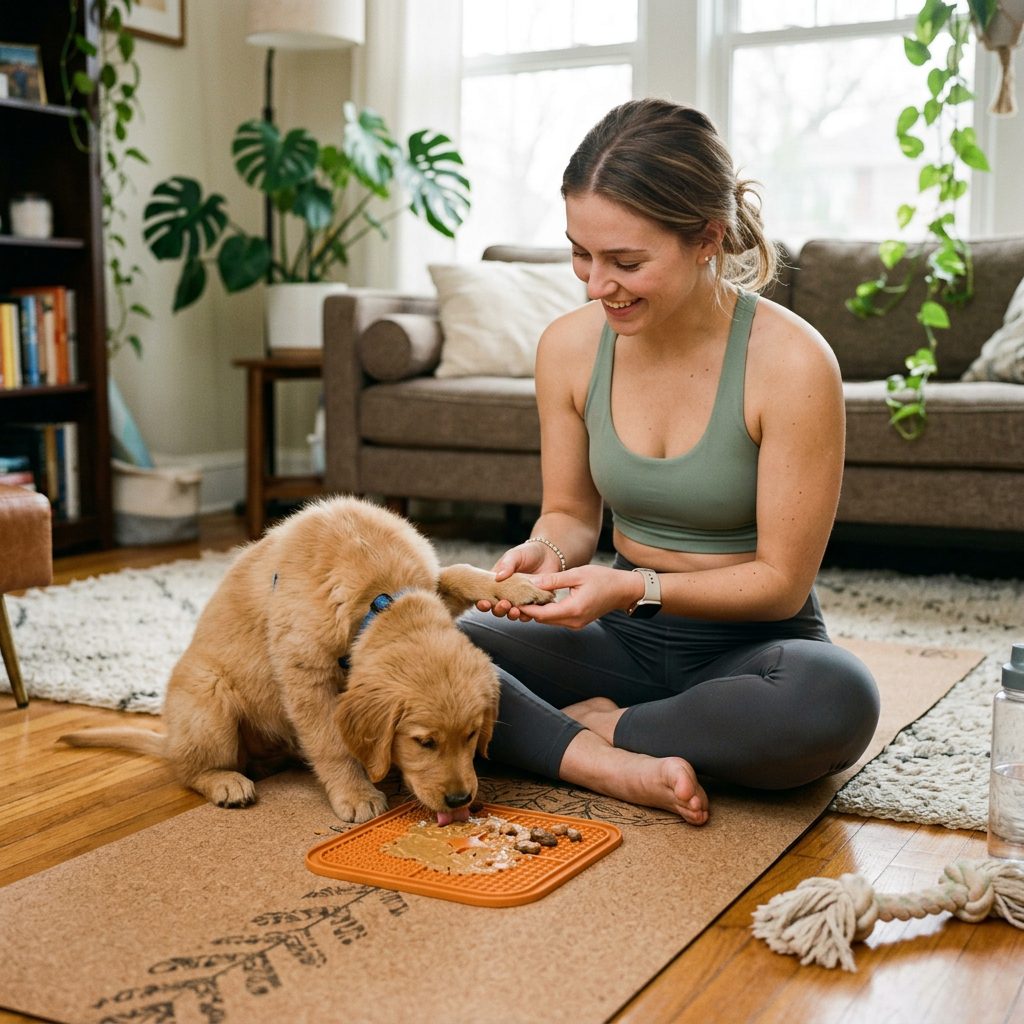
Some breeds (looking at you, Huskies and Shiba Inus!) are known for the ‘death scream’ the moment you touch their feet. If your puppy screams even though you haven’t cut anything, they are expressing anticipatory anxiety. To fix this, go back two steps in your training. Spend more time on the ‘Magic Touch’ phase. Use a lick mat smeared with peanut butter or wet food to provide a continuous stream of reinforcement while you work.
The ‘Quick’ Accident
If you accidentally cut the quick, don’t panic. Your puppy will react to your energy. If you gasp and start apologizing frantically, they will learn that something terrible happened. Instead, calmly apply the styptic powder, give a high-value treat, and end the session on a positive note. It’s a minor injury that heals quickly, but the psychological impact is what we need to manage.
The Resistance Factor
If your puppy is constantly pulling their paw back, try changing your positioning. Some puppies feel more secure sitting in your lap, while others prefer standing on a non-slip grooming table or mat. Never trim nails on a slippery hardwood floor; the lack of traction makes puppies feel vulnerable and anxious.
Advanced Tips for Savvy Owners: Maintenance and Consistency
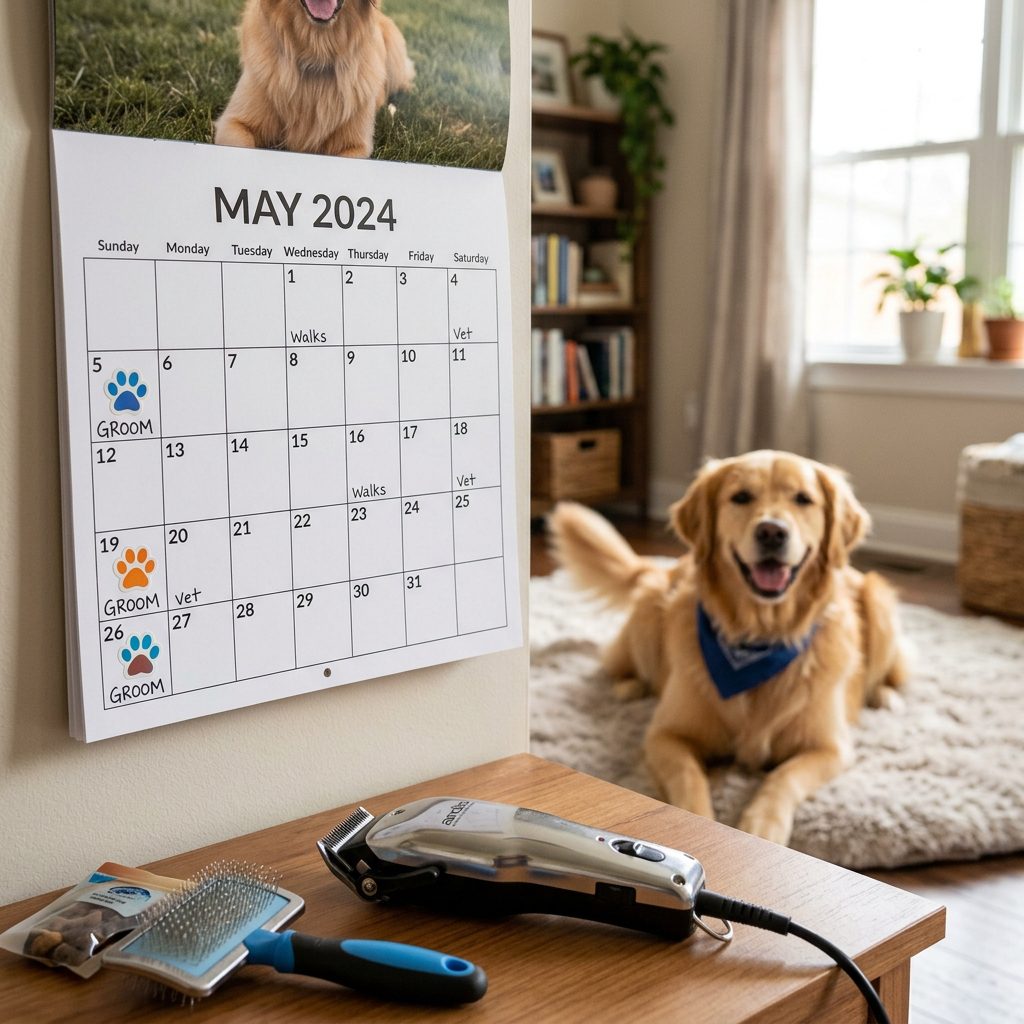
Once your puppy is trained, the key to keeping the ‘drama’ away is consistency. Nails should be checked every 1-2 weeks. A good rule of thumb: if you can hear the ‘click-click-click’ of nails on the floor, they are too long. Long nails push the toe bones into an unnatural position, which can lead to arthritis and joint pain over time.
| Activity Level | Trimming Frequency | Focus Area |
|---|---|---|
| High (Hiking/Pavement) | Every 3-4 weeks | Mostly dewclaws (others wear down naturally). |
| Moderate (Grass/Carpets) | Every 2 weeks | All nails; focus on keeping the quick short. |
| Low (Senior/Indoor) | Every week | Full trim; nails grow faster without wear. |
The ‘Quick’ actually recedes as you trim the nail. If your puppy’s nails are quite long, you won’t be able to get them short all at once. By trimming a tiny bit every week, the quick will naturally shrink back, allowing you to achieve that perfectly manicured, silent walk. This is especially important for dewclaws, which can grow in a full circle and pierce the leg pad if ignored for months.
Consider implementing ‘Consent Signals.’ Some trainers teach their dogs to put their paw in the owner’s hand as a sign they are ready. If the dog removes their paw, the owner stops. This level of communication builds an unbreakable bond of trust and ensures that the ‘Dewclaw Drama’ is a thing of the past.
Conclusion
A Lifetime of Happy Paws
Training your puppy for nail trims is one of the greatest gifts you can give them. By removing the fear and pain associated with this essential grooming task, you are setting them up for a lifetime of comfort and health. Remember, the ‘Dewclaw Drama’ is only a temporary hurdle. With patience, the right tools, and a mountain of treats, your puppy will soon be the one offering their paw for a trim.
Keep your sessions short, keep your clippers sharp, and always keep your sense of humor. You are doing a great job, and your savvy approach to canine care is exactly what your puppy needs to thrive. Happy trimming!