Stop the Spread! The Simple Dough Secret to Getting Perfect, High-Definition Custom Dog Cookie Stamps Every Time
Hey there, fellow savvy dog parents! Let us talk about a very specific, incredibly frustrating baking heartbreak. You finally did it. You went online and ordered that adorable, personalized custom cookie stamp with your dog’s name on it. You envisioned a beautiful, Instagram-worthy jar sitting on your kitchen counter filled with perfectly branded, artisan-level treats. So, you whip up a generic dog biscuit recipe, press your fancy new stamp into the dough, pop them in the oven, and wait. But when the timer goes off? You pull out a tray of puffy, amorphous brown blobs. The name is gone. The cute little paw print is erased. Your beautiful custom treats look like sad little pancakes.
Listen, I have been there. As the Canine Nutrition Hacker, I do not just obsess over ingredient labels and exposing cheap commercial fillers; I also demand perfection when I am putting in the effort to bake from scratch. You are making homemade treats because you want to control exactly what goes into your best friend’s body, avoiding those nasty preservatives, mystery meats, and cheap corn gluten meals found in the big-box store aisles. But just because we are baking healthy, whole-food treats does not mean we have to sacrifice aesthetics. The secret to getting those crisp, high-definition stamped cookies isn’t magic; it is simple food science.
Safety Disclaimer: Before we dive into the dough, remember that I am a savvy dog owner and nutrition hacker, not a veterinarian. While these treats are made with wholesome, dog-safe ingredients, they are meant for intermittent or supplemental feeding only. Always introduce new foods slowly, and consult your holistic vet if your dog has specific dietary restrictions, allergies, or requires a specialized diet. And remember: NEVER use ingredients containing xylitol (birch sugar), which is highly toxic to dogs!
Today, we are going to expose the real reason your dough is spreading and walk through the ultimate, no-nonsense recipe to lock in those crisp edges. We will look at the hero ingredients that hold their shape, the villain ingredients that cause the dreaded spread, and how making these premium stamped treats at home is going to save you a massive amount of money compared to buying boutique bakery cookies. Grab your mixing bowls and your custom stamps, because we are about to hack the perfect dog cookie.
The Science of the Spread: Why Your Treats Are Blobbing
If you want to stop the spread, you have to understand the enemy. Why does dough lose its shape in the first place? When you are baking human cookies (like chocolate chip or snickerdoodles), you actually want a little bit of spread and rise. That is what gives a cookie its soft, chewy texture. But when we are talking about stamped dog cookies, spread is the ultimate enemy of definition.
The Leavening Villains
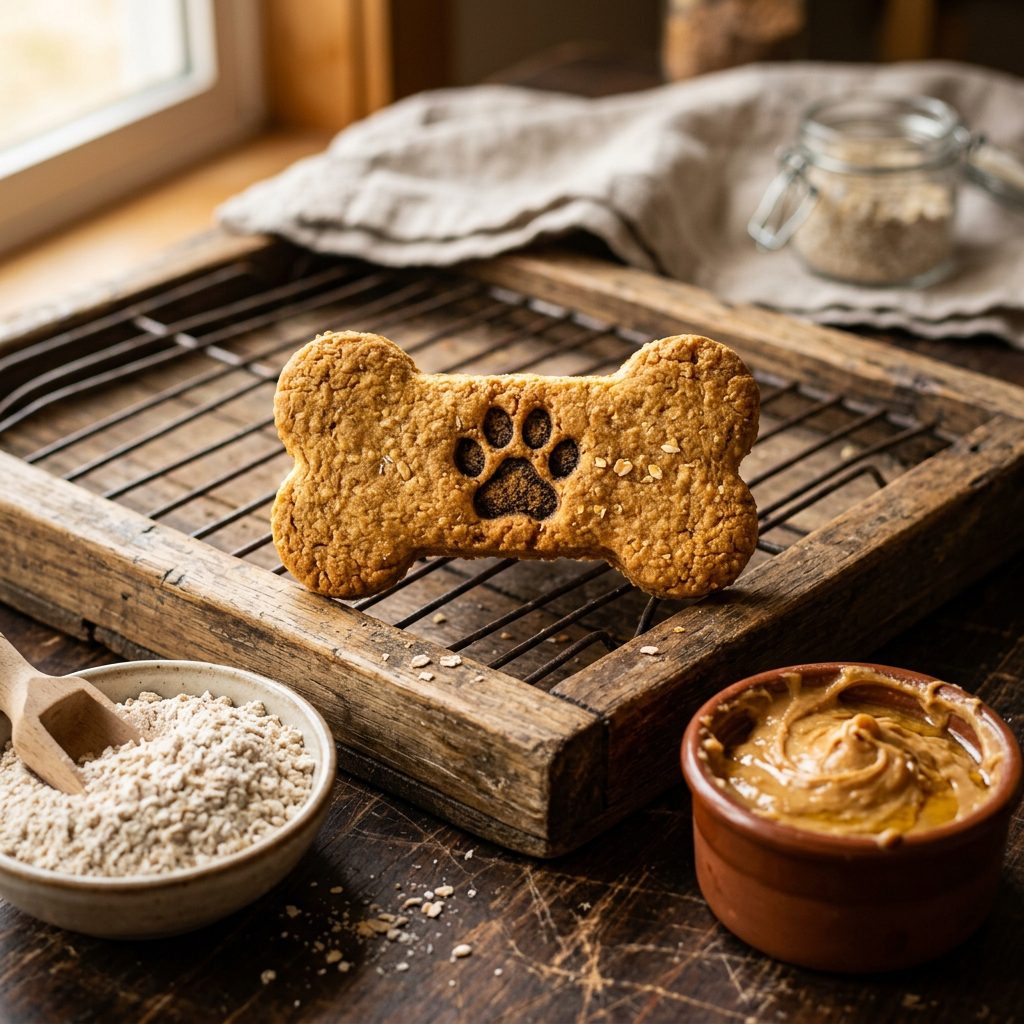
The number one reason your custom stamps disappear in the oven is the use of leavening agents. Many generic internet recipes for dog treats carelessly throw in a teaspoon of baking soda or baking powder. Stop doing this immediately. Baking soda and baking powder create carbon dioxide gas bubbles when they hit heat and moisture. This gas causes the dough to puff up and expand outward. The moment that dough puffs, your beautiful, delicate stamped letters stretch and vanish. For high-definition cookies, we want a dense, shortbread-like texture. No leavening agents allowed.
The Fat Melting Point
The second culprit is fat. Fat is essential for flavor and keeping the dough workable, but different fats melt at different speeds. If you use a fat that melts too quickly in the oven (like certain cheap oils or even standard butter, which isn’t great for dogs anyway), the structure of the cookie collapses before the flour has time to set and bake. This results in a puddle of dough. We need a fat source that holds its ground. Natural peanut butter (the kind with just peanuts and maybe a pinch of salt) is excellent because the protein and fiber in the peanuts help stabilize the natural oils. Coconut oil can also work, but it must be managed carefully with temperature.
Hydration and Steam
Lastly, let us talk about moisture. If your dough is too wet, the excess water turns into steam inside the hot oven. Steam pushes outward, causing the cookie to expand and distort. A high-definition dough needs to be relatively dry and stiff, almost like modeling clay. If your dough sticks to your fingers, it is too wet to stamp. By controlling these three elements—eliminating leavening agents, stabilizing our fats, and keeping moisture perfectly balanced—we create a structural fortress for our custom stamps.
Building the Ultimate Dough: Hero Ingredients vs. The Villains
As a nutrition hacker, I never compromise on the quality of ingredients. A beautiful cookie is worthless if it is full of inflammatory fillers. Let us break down exactly what we are putting into our mixing bowl, and more importantly, what we are keeping out.
The Flour Foundation: Oat Flour is King
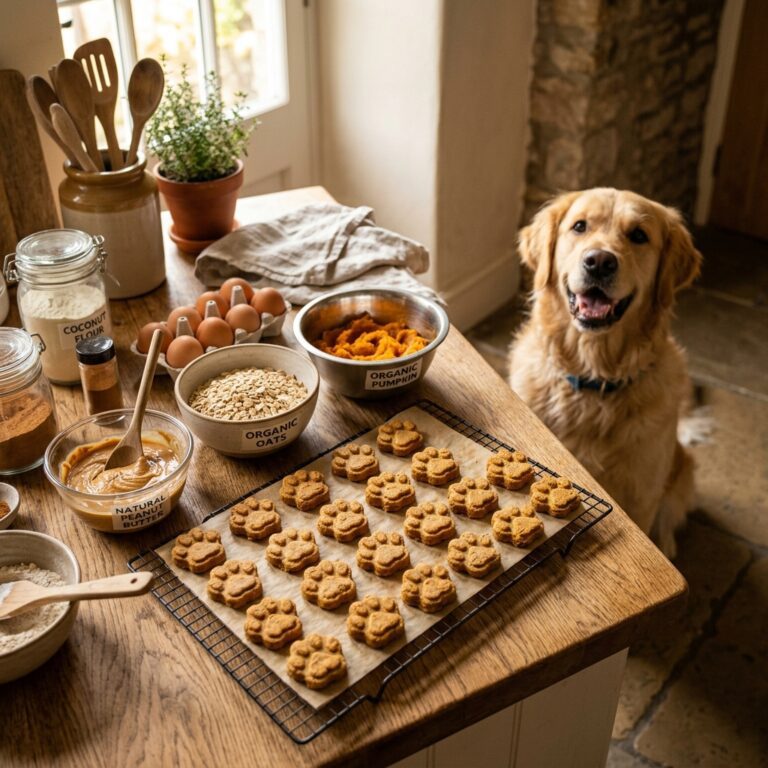
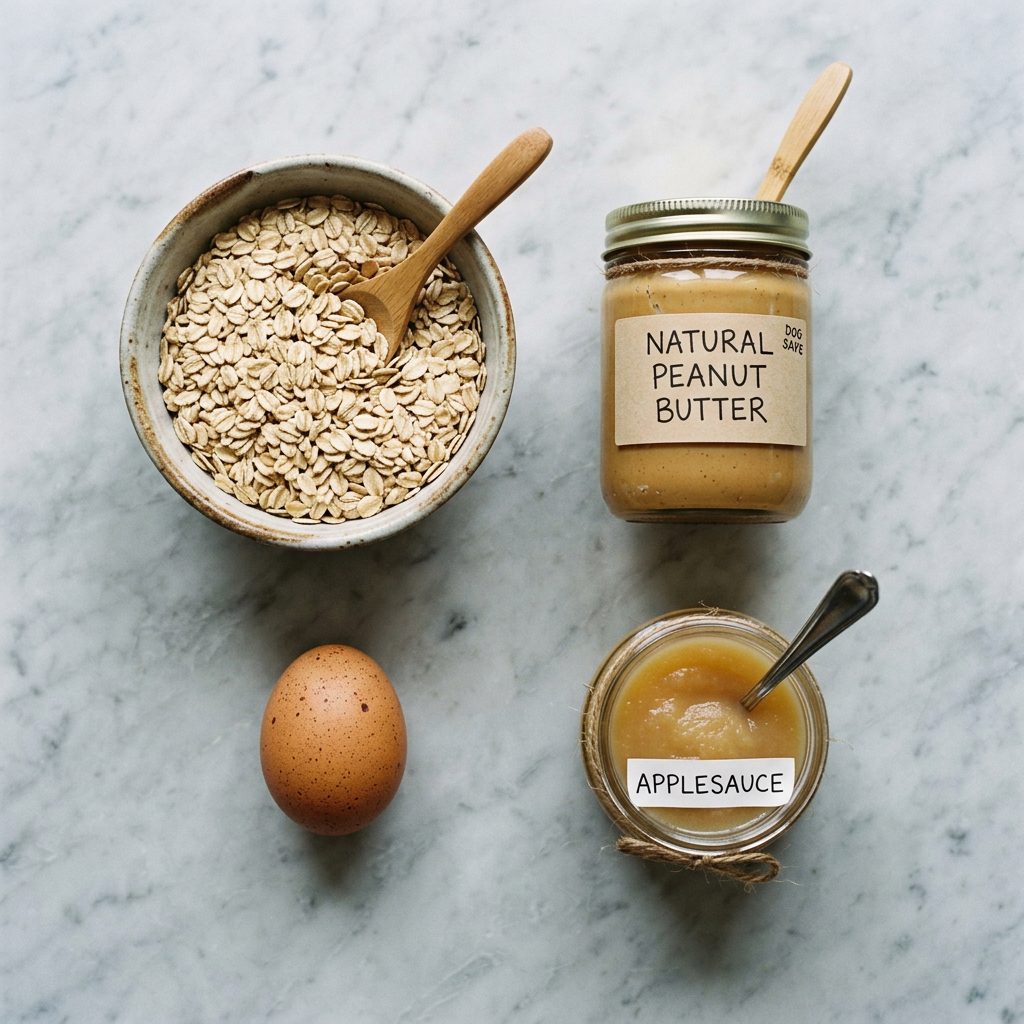
Many commercial treats use cheap, bleached white wheat flour or cornmeal. These are empty calories that can trigger allergies and yeast issues in sensitive dogs. Our Hero Ingredient is Oat Flour. Oats are a fantastic, gluten-free (if certified) carbohydrate source that is gentle on a dog’s digestive system. Oat flour also has a slightly denser, heavier structure than fluffy white flour, which is exactly what we want to prevent spreading. You do not even need to buy expensive pre-milled oat flour; just throw plain, old-fashioned rolled oats into your blender or food processor and blast them into a fine powder.
The Binder: The Incredible Egg
To hold our heavy oat flour together without adding too much liquid water, we use eggs. Eggs are a nutritional powerhouse for dogs, packed with bioavailable protein and essential amino acids. The proteins in the egg white coagulate when heated, creating a rigid structure that locks your custom stamp design in place permanently.
The Flavor and Fat: Natural Peanut Butter
Dogs go crazy for peanut butter, but you must be a label-reading detective here. The Villain: Xylitol. Many “sugar-free” peanut butters use xylitol (sometimes labeled as birch sugar), which is deadly to dogs even in tiny amounts. Furthermore, standard commercial peanut butters are loaded with added sugars and hydrogenated vegetable oils (trans fats). The Hero: 100% Natural Peanut Butter. The only ingredient on the label should be “peanuts.” This natural fat provides the perfect texture for our shortbread-style dough without introducing inflammatory garbage.
The Secret Weapon: Unsweetened Applesauce
Instead of adding water or broth to hydrate the dough, I use a small amount of unsweetened applesauce. The pectin in the apples acts as a natural binder and helps create a smooth, pliable dough that takes a stamp beautifully. Plus, it adds a touch of natural sweetness and fiber without the sugar spikes.
The Hacker’s High-Definition Master Recipe
Alright, it is time to put the science into action. This recipe is meticulously balanced to give you a stiff, workable dough that will hold the most intricate custom stamps without spreading a single millimeter.
The Ingredients
- 2.5 cups of finely ground Oat Flour (plus a little extra for dusting your workspace)
- 1/2 cup of 100% Natural Peanut Butter (absolutely NO xylitol)
- 1/4 cup of Unsweetened Applesauce
- 1 Large Egg (room temperature is best)
The Step-by-Step Execution
- Preheat and Prep: Preheat your oven to 325 degrees Fahrenheit (165 degrees Celsius). We use a slightly lower temperature than standard baking to dry the cookies out slowly without puffing them up. Line a heavy-duty baking sheet with parchment paper.
- Mix the Wets: In a large mixing bowl, combine the natural peanut butter, unsweetened applesauce, and the egg. Whisk them together until you have a smooth, uniform paste.
- Incorporate the Dry: Gradually add the oat flour into your wet mixture, about a half cup at a time. Mix with a sturdy wooden spoon until it becomes too thick to stir.
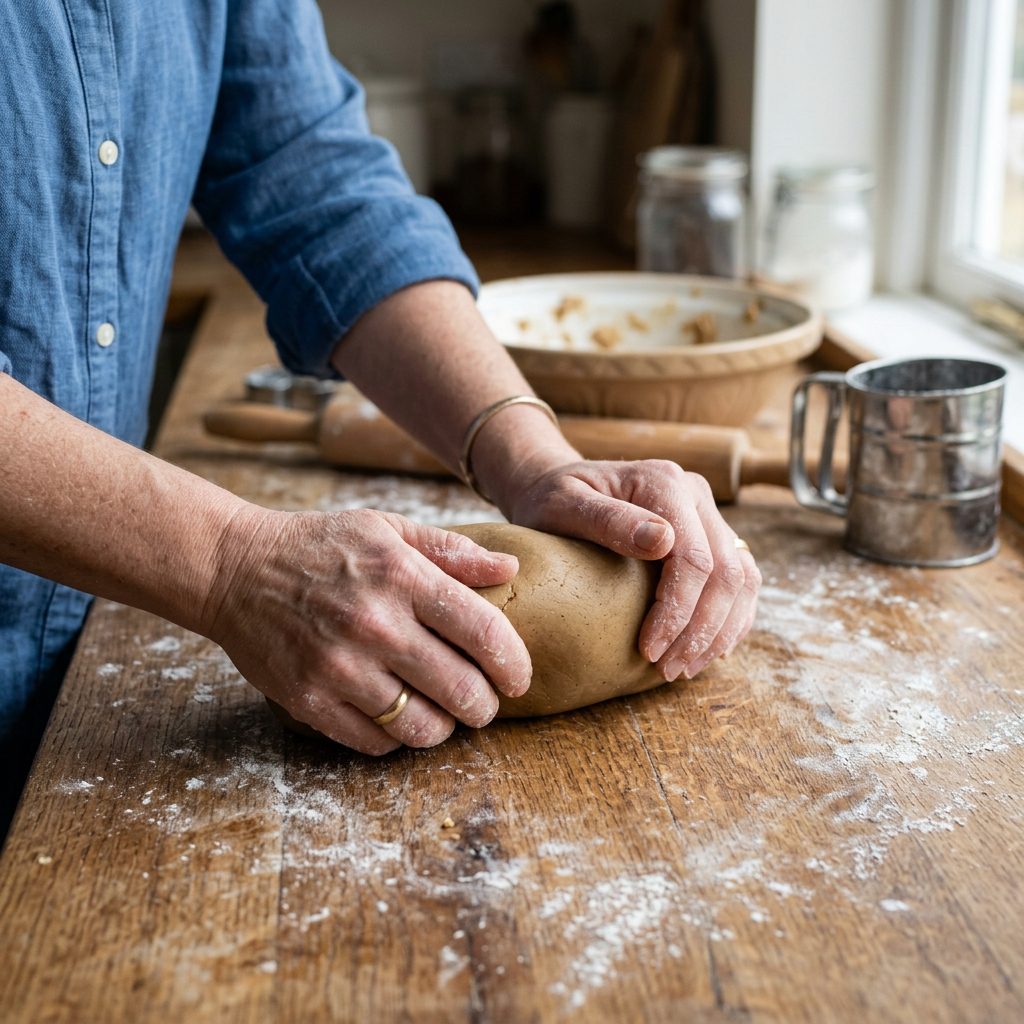
- Get Your Hands Dirty: Turn the dough out onto a lightly oat-floured surface. Knead the dough with your hands for about 2-3 minutes. You are looking for a texture similar to Play-Doh. If it is too sticky, add a dusting of oat flour. If it is crumbling and won’t hold together, add a tiny splash of water (just a teaspoon at a time).
- The Chilling Secret: Do not skip this! Wrap the dough ball in plastic wrap and place it in the refrigerator for 20 to 30 minutes. Chilling firms up the peanut butter fats and relaxes the dough, which is the ultimate insurance policy against spreading in the oven.
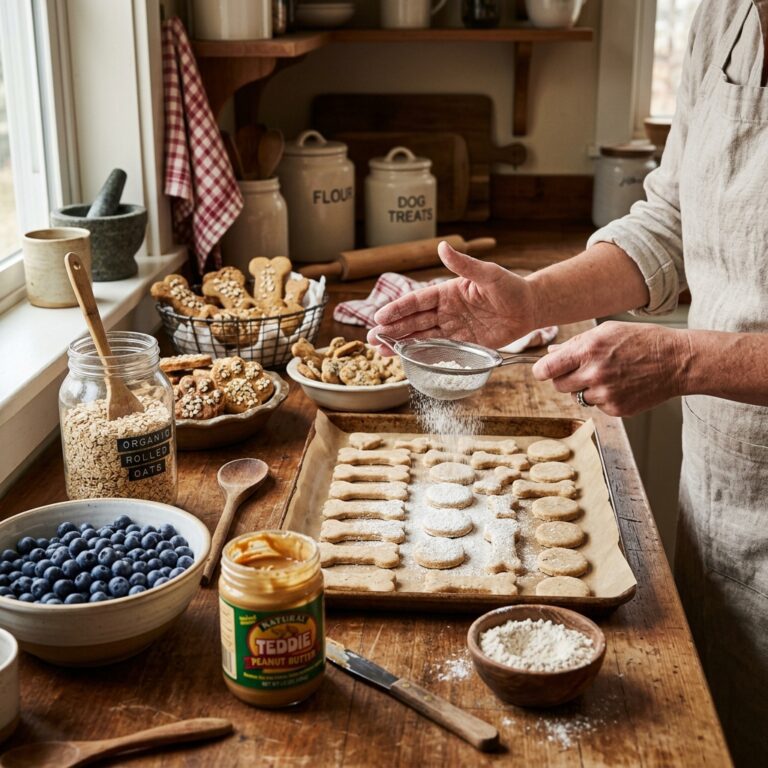
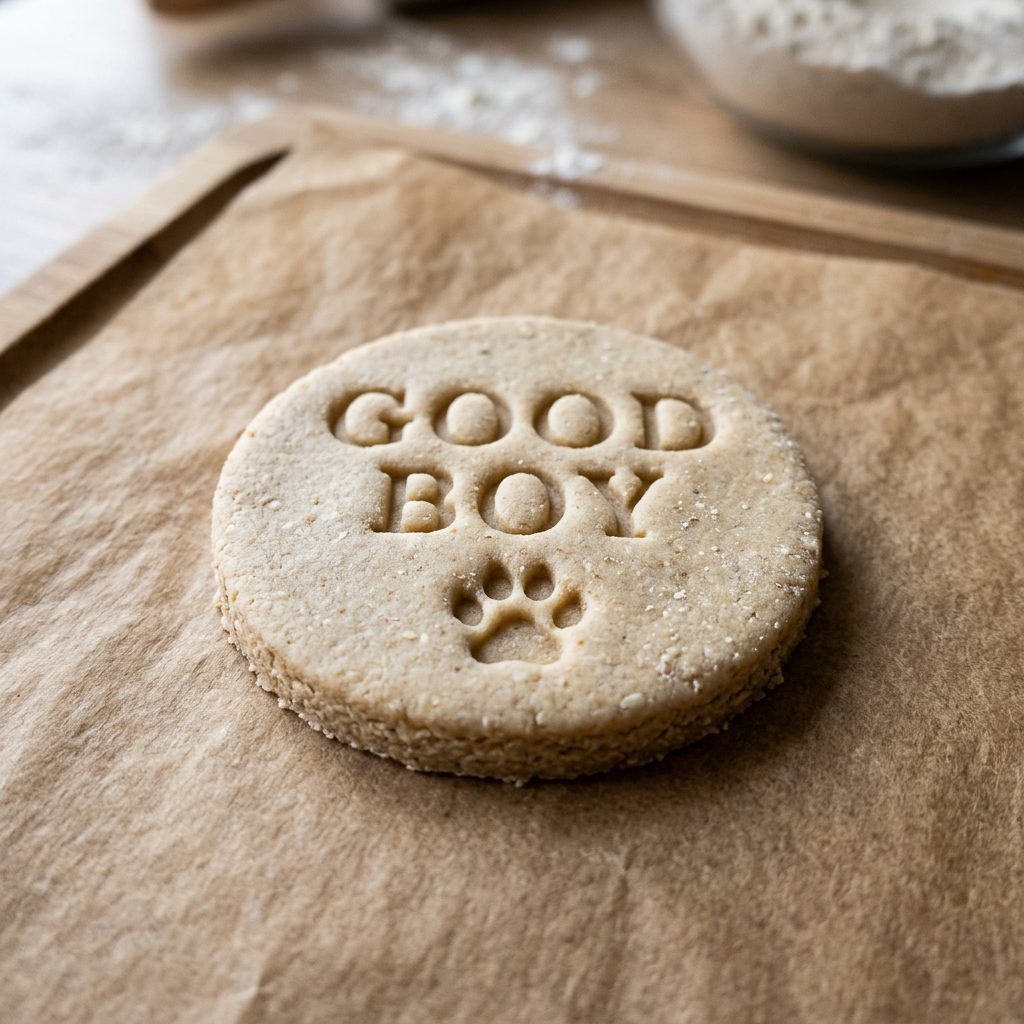
- Roll and Stamp: Roll the chilled dough out to exactly 1/4-inch thickness. Dip your custom cookie stamp lightly in oat flour, tap off the excess, and press firmly into the dough. Cut out the shape and transfer to your parchment-lined baking sheet.
- The Bake: Bake at 325 F for 20 to 25 minutes. Because there are no leavening agents, you can place the cookies quite close together on the sheet; they will not expand. For a crunchier biscuit that lasts longer, turn the oven off after 25 minutes and leave the cookies inside as the oven cools down to dehydrate them completely.
The Real Cost: Boutique Dog Bakery vs. Your Kitchen
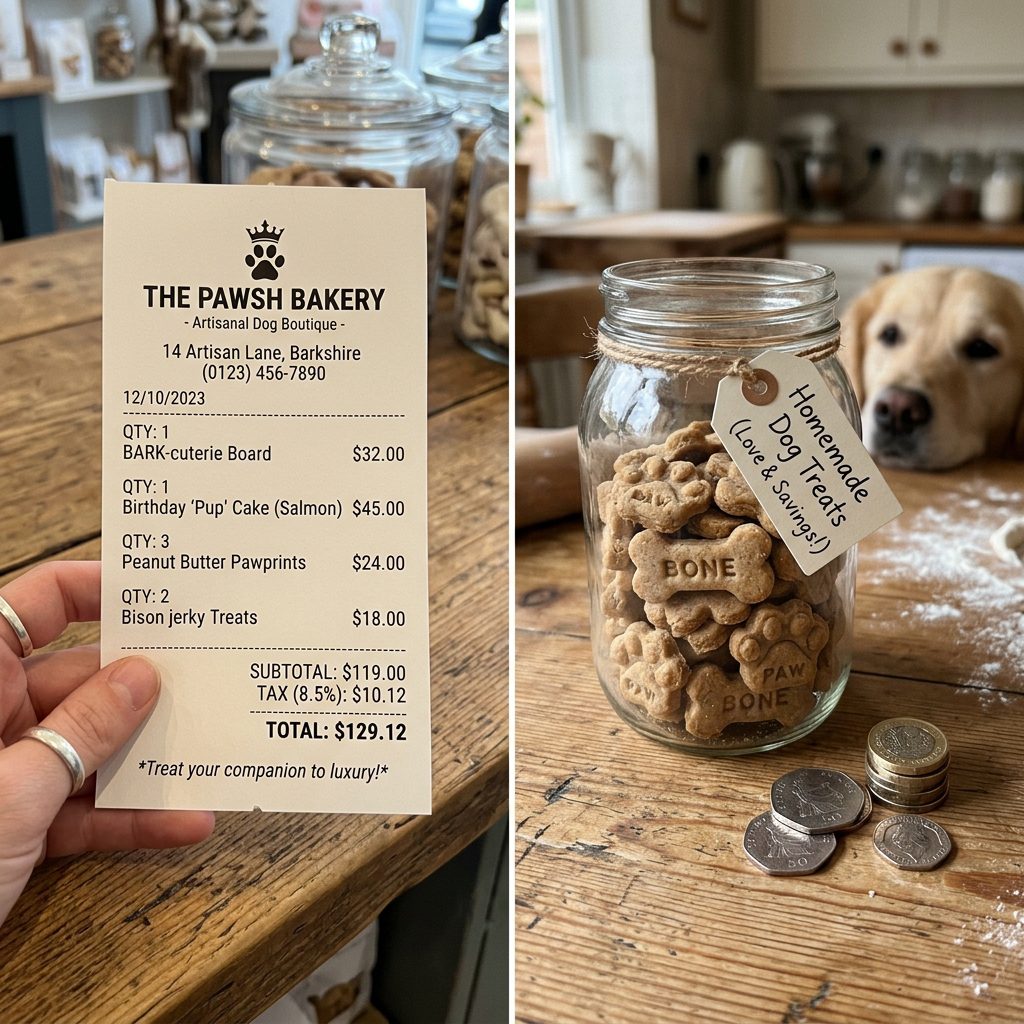
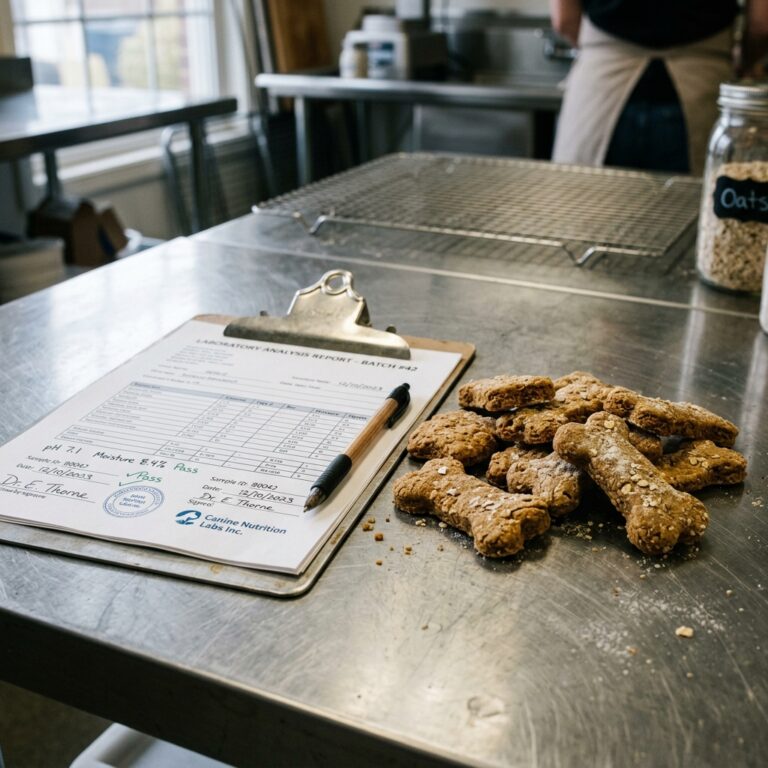
As a nutrition hacker, I love looking at the financial breakdown. When you walk into a boutique dog bakery or order custom stamped treats online, you are paying a massive premium for the aesthetic. Often, those expensive treats are still using cheap wheat flour and sugary glazes to make them look appealing to humans. Let us look at the real numbers and see exactly how much money you save by taking control of your dog’s nutrition and baking these high-definition treats yourself.
| Treat Source | Cost Per Batch (approx. 30 treats) | Ingredient Quality | The Hacker’s Verdict |
|---|---|---|---|
| Boutique Online Custom Cookies | $25.00 – $35.00 + Shipping | Often contains wheat, sugar, or preservatives to extend shelf life. | Skip it. You are paying for the stamp, not the nutrition. |
| Big Box Store “Premium” Treats | $12.00 – $18.00 | Heavy on fillers like corn gluten meal, soy, and artificial colors. No custom stamping. | Avoid. Low quality masked by clever marketing. |
| Our High-Def DIY Dough | $3.50 – $4.50 | 100% Whole Foods: Oat flour, natural peanut butter, real egg. | The Clear Winner. Absolute control, perfect aesthetics, massive savings. |
When you break it down, making a batch of 30 custom-stamped, premium whole-food cookies at home costs less than five bucks. If you treat your dog daily, the savings over a year easily pays for all the cute custom cookie cutters you could ever want on Etsy, plus a bag of premium raw-coated kibble to boot. This is what it means to be a savvy dog owner: maximizing quality while minimizing wasted cash.
Batch Cooking, Stamping Secrets, and Storage Hacks
Now that you have the ultimate no-spread dough recipe, let us talk about workflow. If you are going to put in the effort to make custom stamped cookies, you want to maximize your time. Here are my insider secrets for flawless execution and long-term storage.
The Floured Stamp Technique
Even with the perfect dough, a detailed stamp can sometimes stick, ruining the design as you pull it away. The trick is to keep a small, shallow bowl of finely ground oat flour next to your rolling station. Before every single press, dip the face of the stamp into the flour, then tap the back of the stamp hard against your hand to knock off the loose excess. You want a micro-thin layer of dust on the stamp, not clumps. Press straight down with firm, even pressure, and lift straight up. Do not wiggle the stamp, or you will blur the letters.
The Double-Chill Method for Extreme Detail
If you live in a very hot climate or your kitchen is warm, the dough might soften while you are rolling and stamping. If you notice the dough getting greasy or soft, stop. Put the rolled-out dough sheet (still on its parchment paper) back into the fridge for 10 minutes. Stamping cold dough yields the sharpest possible lines. Some professional dog bakers even pop the tray of cut, stamped cookies into the freezer for 5 minutes right before they go into the hot oven. This “shock” freezes the fat and guarantees zero spread.
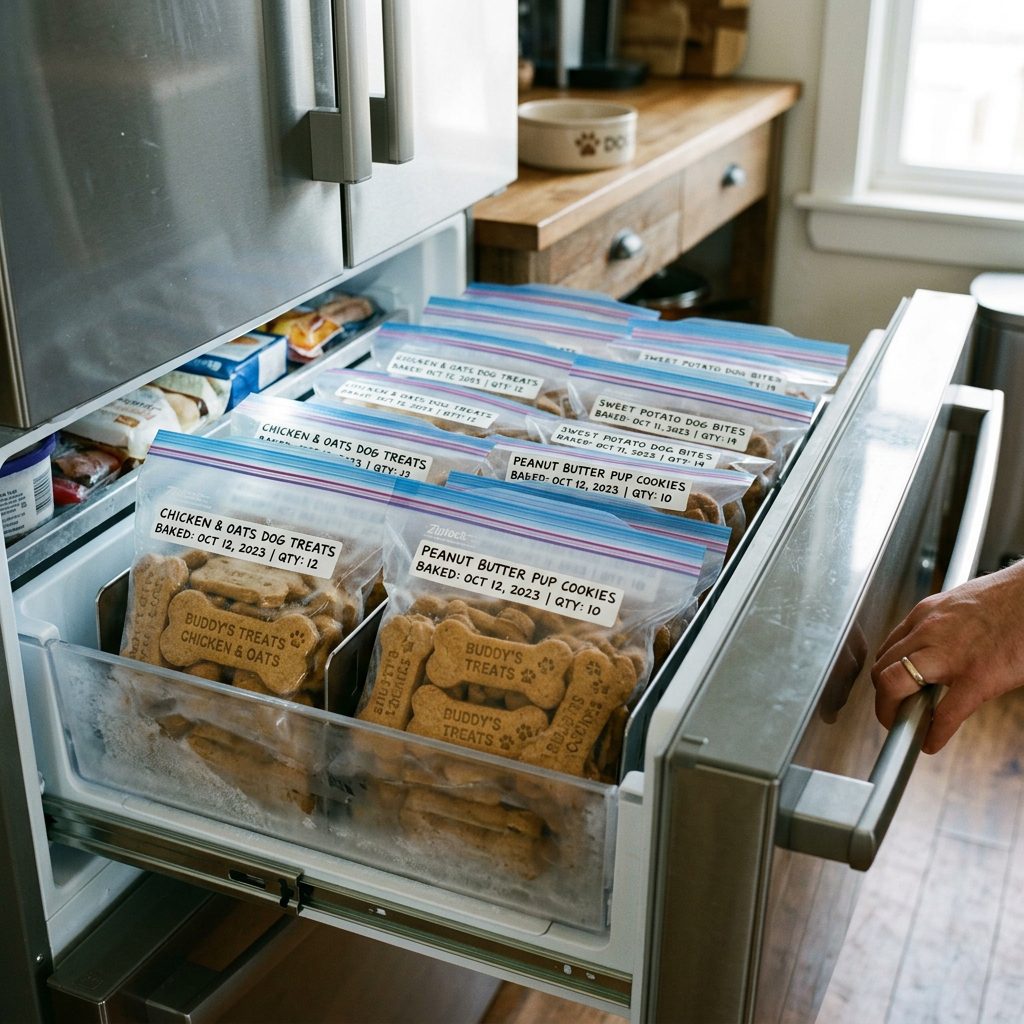
Batch Cooking and Freezing
Because our recipe contains no nasty chemical preservatives, these fresh treats will not last for months in a jar on the counter like the store-bought junk. Stored in an airtight container at room temperature, they are good for about a week. In the fridge, they will last up to three weeks.
Hacker Tip for Batching: Make a triple batch of the dough. You can freeze the raw dough balls wrapped tightly in plastic wrap for up to 3 months. Just thaw in the fridge overnight before rolling. Alternatively, you can bake all the cookies at once, let them cool completely, and freeze the finished cookies in a freezer-safe ziplock bag. Pull out a handful each week, and your dog will have premium, custom-stamped treats on demand all year round!
Conclusion
So there you have it, the ultimate insider secret to stopping the spread and getting perfect, high-definition custom dog cookie stamps every single time. By ditching the leavening agents, controlling our moisture with applesauce, and relying on the stable fats of natural peanut butter, we have engineered a dough that respects your time, your wallet, and your dog’s health.
You no longer have to choose between feeding your dog wholesome, filler-free ingredients and having those adorable, personalized treats that look like they came from a high-end boutique bakery. You are the master of your kitchen, and as a savvy dog owner, you now have the knowledge to bake with precision. So go ahead, dust off that custom stamp, fire up the oven, and treat your best friend to something truly special. They might not be able to read their name on the cookie, but they will absolutely taste the love and quality in every single bite. Happy baking, hackers!