The Mind-Blowing Baking Sheet Grid Hack to Prep 1,000 Training Treats in Only 10 Minutes!
The Great Training Treat Robbery
Let’s get real for a second. If you’re actively training your dog—whether you’re working on a rock-solid recall or just trying to stop them from lunging at the neighborhood squirrel—you are burning through treats like wildfire. And if you’re buying those tiny bags of ‘premium’ training treats from the big-box pet stores, you’re getting fleeced. Most of those bags are 60% filler, 30% sugar (under names like glycerin or molasses), and 10% actual protein, all wrapped up in a price tag that rivals a prime ribeye steak per pound.
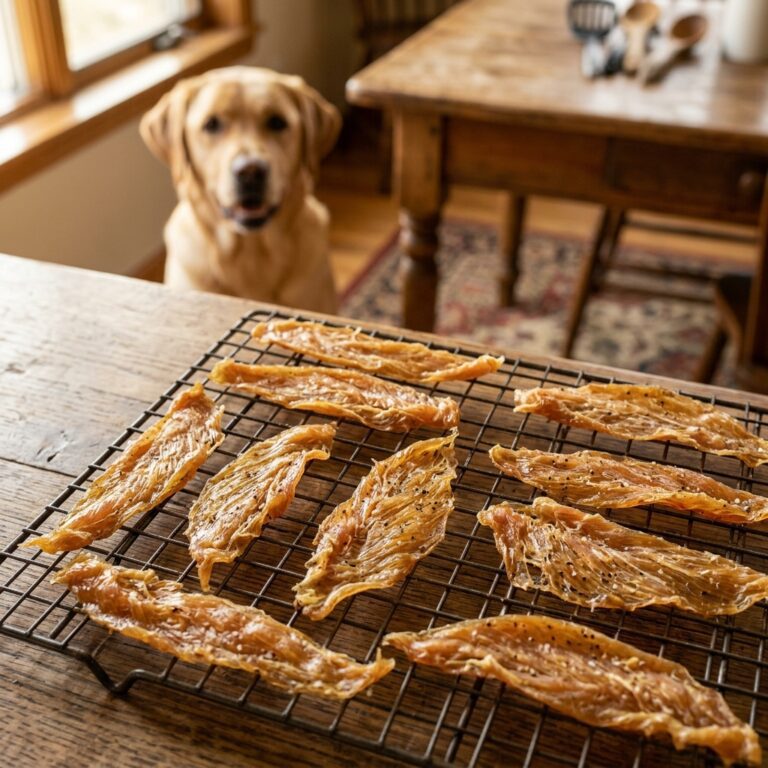
As the Canine Nutrition Hacker, I’m here to tell you there’s a better way. You don’t have to choose between your dog’s health and your monthly mortgage payment. I’ve discovered a method that allows you to prep over 1,000 high-value, grain-free training treats in about 10 minutes of active work time. We’re talking about treats that are kibble-sized, non-crumbly, and so enticing your dog will practically do your taxes for a taste. The secret? It’s all in the grid.
Insider Secret: Most commercial training treats use ‘vegetable glycerin’ to keep them moist. While ‘natural,’ it’s essentially a caloric filler that adds zero nutritional value. We’re skipping the junk and focusing on pure performance.
In this guide, I’m going to break down the exact tools you need, the ‘squeegee’ technique that saves your sanity, and a nutritional analysis that will make you wonder why you ever bought store-bought treats in the first place.
The Anatomy of a Rip-Off: Store-Bought vs. Hacker Style
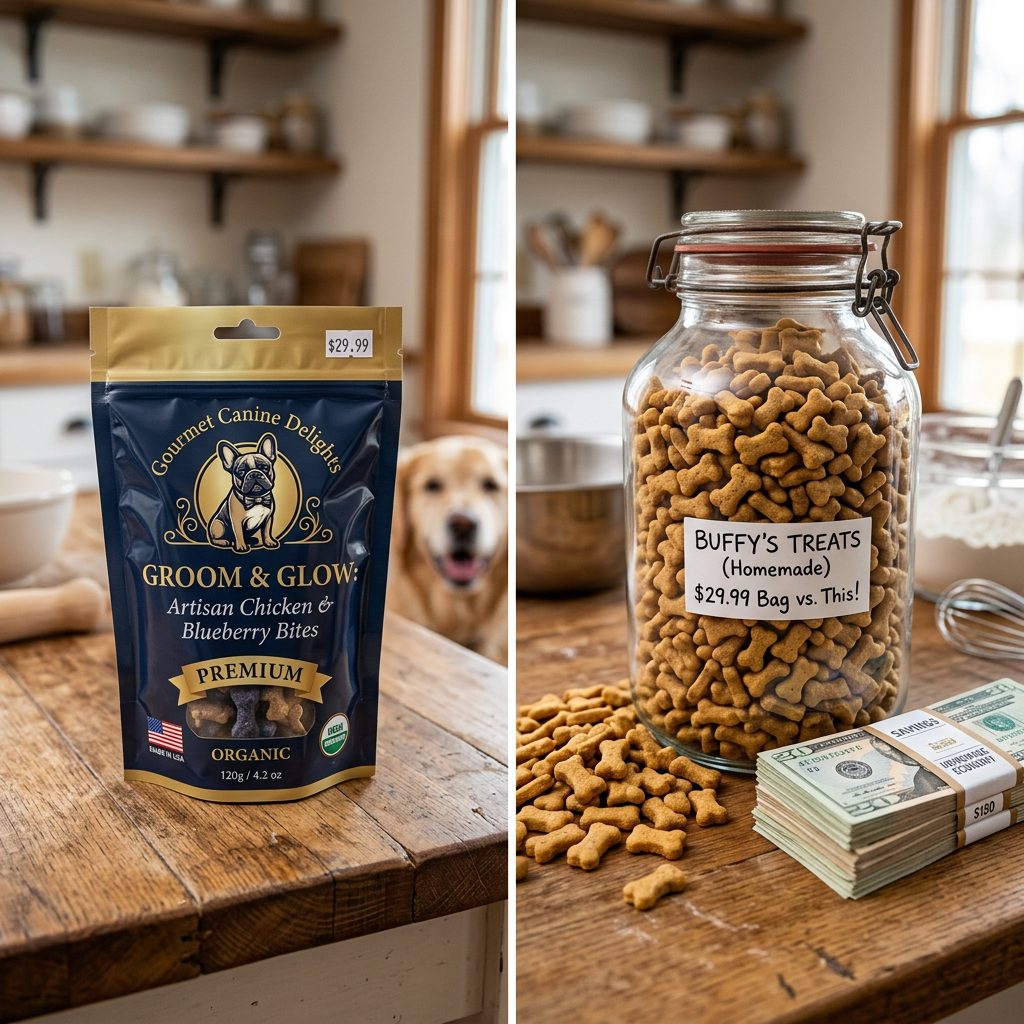
Before we dive into the ‘how-to,’ we need to look at the ‘why.’ Have you ever actually calculated the price per pound of those little 4-ounce bags? It’s eye-watering. Most savvy dog owners think they are doing the right thing by picking up ‘grain-free’ or ‘natural’ options, but the ingredient list often tells a different story. You’ll see things like pea starch, potato flour, and animal by-product meal sitting at the top of the list.
The Cost Comparison
Let’s look at the cold, hard numbers. I’ve compared a popular ‘premium’ training treat brand against our DIY Hacker recipe. The results are frankly embarrassing for the pet food industry.
| Feature | Store-Bought ‘Premium’ | Hacker DIY Grid Treats |
|---|---|---|
| Price Per Pound | $24.00 – $32.00 | $4.50 – $6.00 |
| Primary Protein | Chicken Meal or ‘Meat’ By-Products | Fresh Liver, Tuna, or Beef |
| Fillers | Glycerin, Sugar, Pea Fiber | None (or minimal Tapioca/Egg) |
| Batch Size | Approx. 150 treats | 1,000+ treats |
| Verdict | Overpriced Junk | Nutritional Goldmine |
By switching to this grid hack, you aren’t just saving money—you are ensuring that every single reward your dog earns is contributing to their muscle mass and cognitive function, rather than adding empty calories to their waistline.
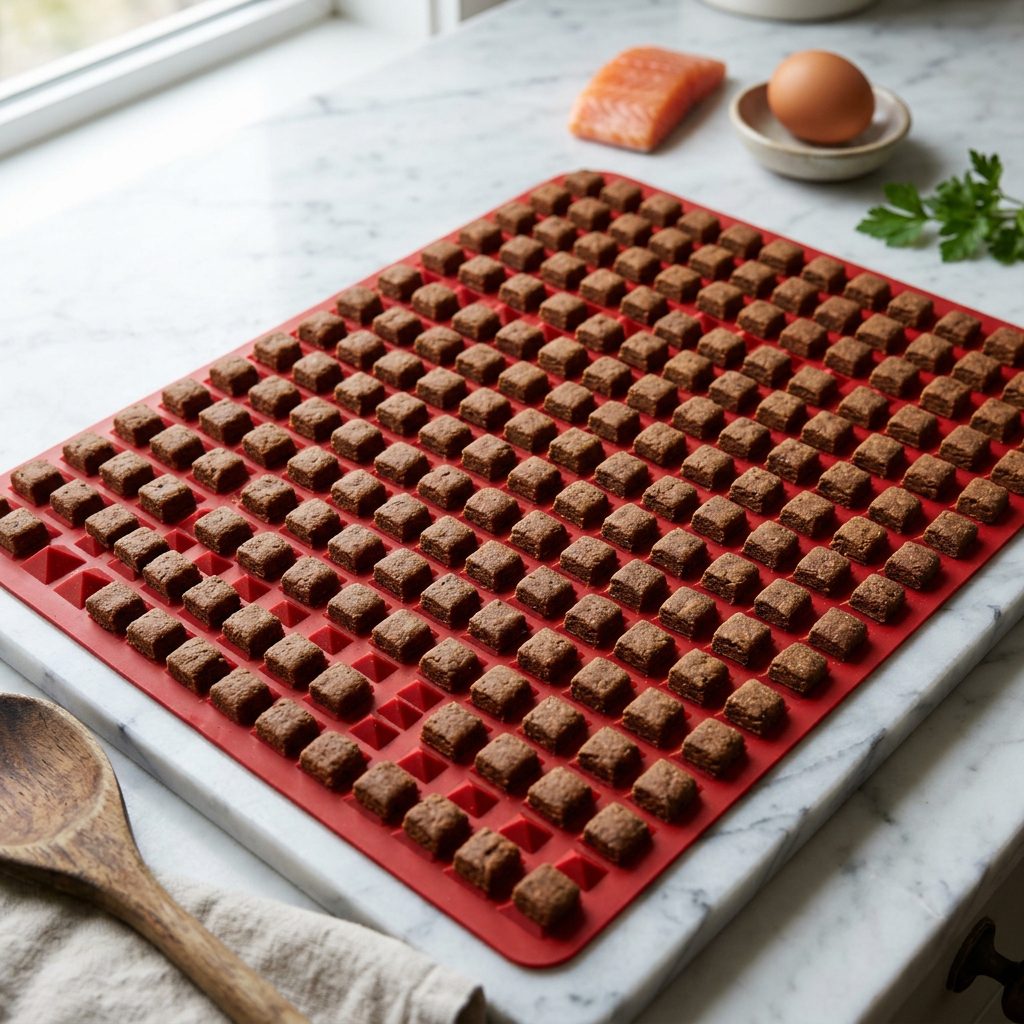
The Secret Weapon: The Silicone Pyramid Mat
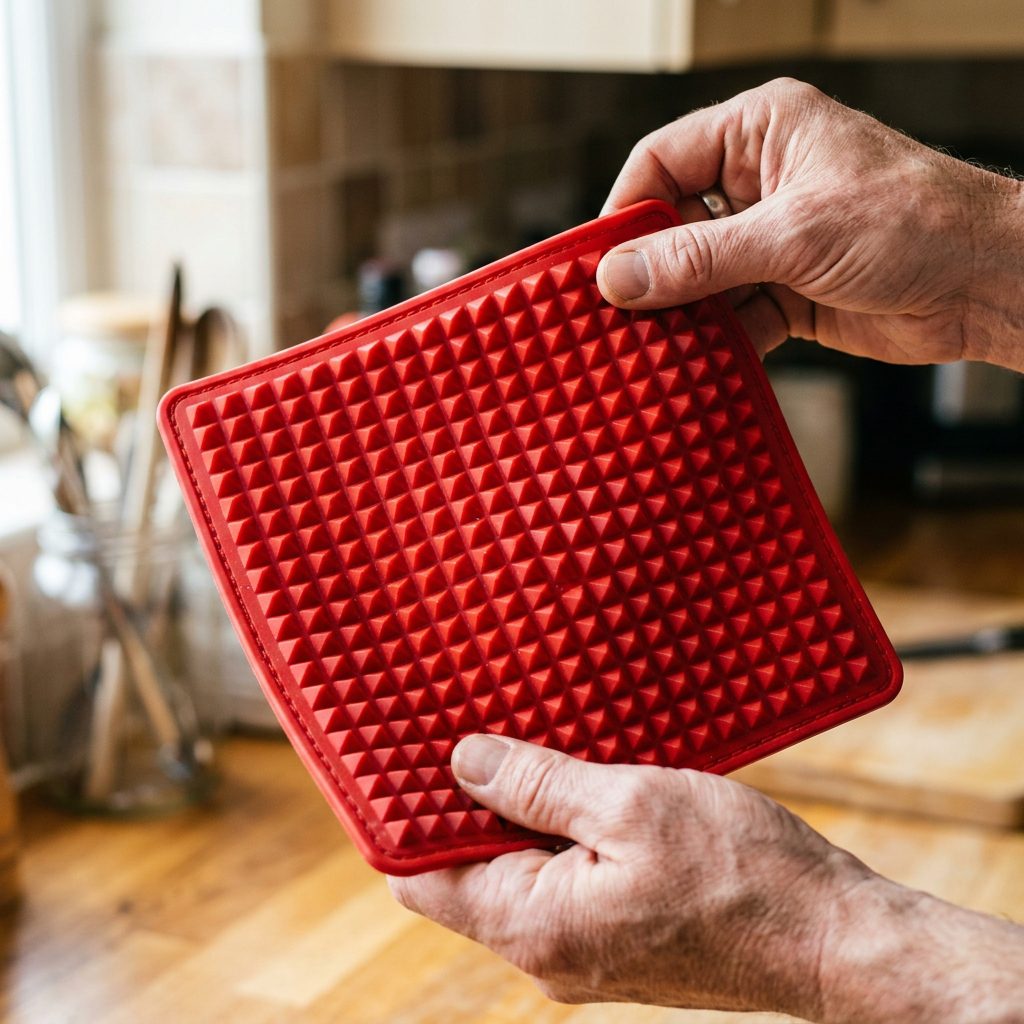
The Tool That Changes Everything
If you’ve tried making DIY treats before, you probably spent hours rolling out dough and using a tiny bone-shaped cookie cutter. Forget that. We don’t have time for that. The ‘Mind-Blowing Hack’ relies on a single, inexpensive kitchen tool: the Silicone Pyramid Baking Mat (often sold as a ‘fat-reducing’ mat for baking chicken or bacon).
These mats feature hundreds of small, inverted pyramid indentations. When you flip the mat over so the ‘points’ are facing down, those indentations become the perfect molds for tiny, uniform treats. One standard mat usually has about 500 holes. Use two mats, and you’ve got 1,000 treats ready to go in one oven cycle.
Why the Grid Works
- Consistency: Every treat is the exact same size, which is crucial for keeping your dog’s caloric intake predictable during heavy training sessions.
- Texture: The silicone allows for even heat distribution, resulting in a treat that is dry to the touch (won’t grease up your pockets) but slightly chewy on the inside.
- Speed: You don’t fill the holes one by one. You pour the batter on top and use a spatula to ‘squeegee’ it into all 500 holes in seconds.
Hacker Tip: Look for mats that are BPA-free and rated for temperatures up to 450°F. I prefer the ones with the smallest pyramid sizes for training ‘puppy push-ups’ or heel work where high-frequency rewards are needed.
The Safe Chef Guide: The ‘High-Value’ Hacker Recipe
Safety First: The Disclaimer
SAFETY DISCLAIMER: I am a dedicated dog owner and nutrition enthusiast, not a veterinarian or a board-certified veterinary nutritionist. These treats are intended for supplemental feeding only and should not exceed 10% of your dog’s daily caloric intake. Always consult your vet before introducing new proteins if your dog has a history of pancreatitis or kidney issues.
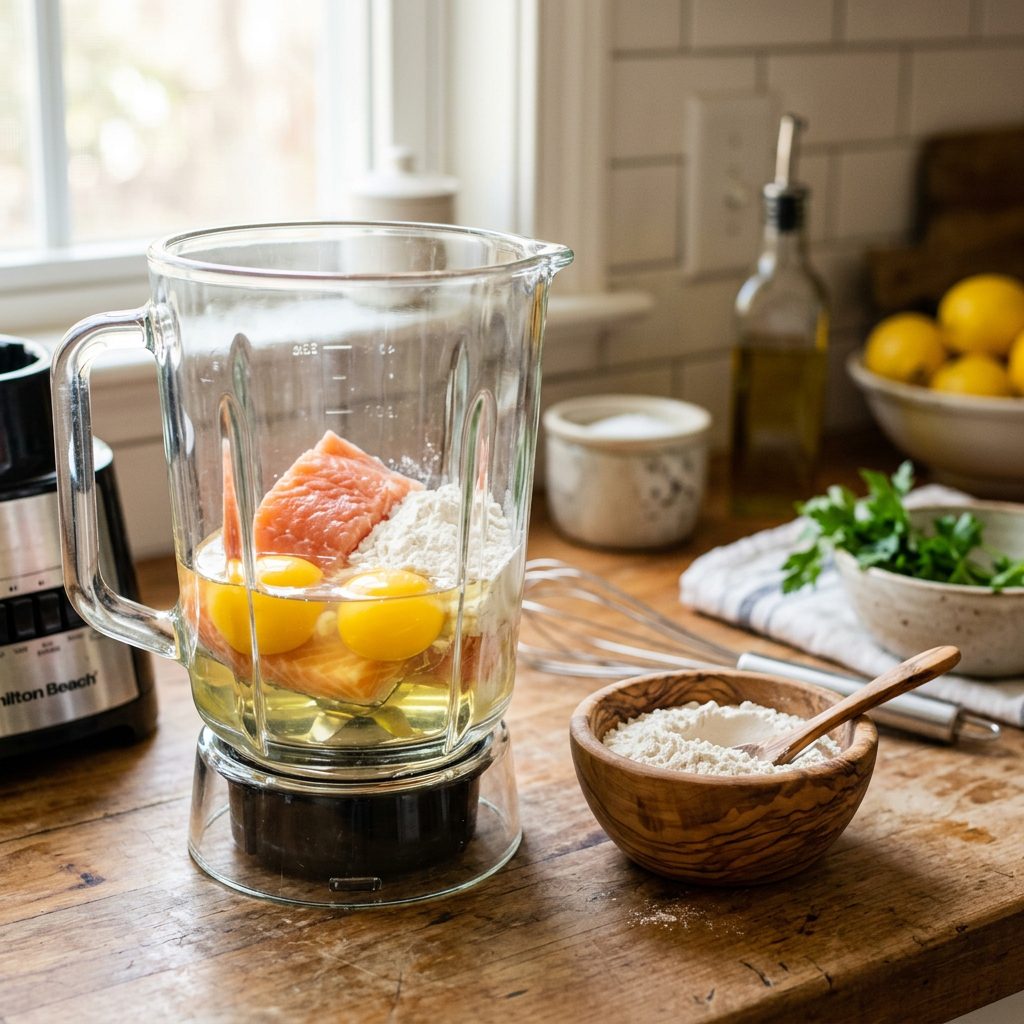
The Base Recipe Ratios
To make the ‘squeegee’ method work, your batter needs to be the consistency of a thick pancake mix or a heavy smoothie. Here is my go-to high-value recipe that drives dogs wild.
- Protein Base (70%): 2 cans of water-packed tuna (drained) OR 1 lb of pureed chicken liver.
- Binder (20%): 2 large eggs.
- Fiber/Structure (10%): 1/2 cup of tapioca flour or oat flour (avoid wheat if your dog is sensitive).
- The ‘Secret Sauce’: 1 tablespoon of nutritional yeast (gives it a cheesy flavor dogs crave without the lactose).
Instructions
- Toss all ingredients into a high-speed blender or food processor.
- Pulse until the mixture is completely liquefied. It should be pourable but not watery.
- If it’s too thick, add a tablespoon of water or low-sodium bone broth. If it’s too thin, add a pinch more flour.
This recipe provides a massive punch of Omega-3 fatty acids (from the tuna) and Vitamin A (if using liver), which are essential for skin, coat, and eye health. Unlike store-bought treats, we aren’t using any artificial preservatives—the baking process and proper storage do the work for us.
The 10-Minute Workflow: Step-by-Step
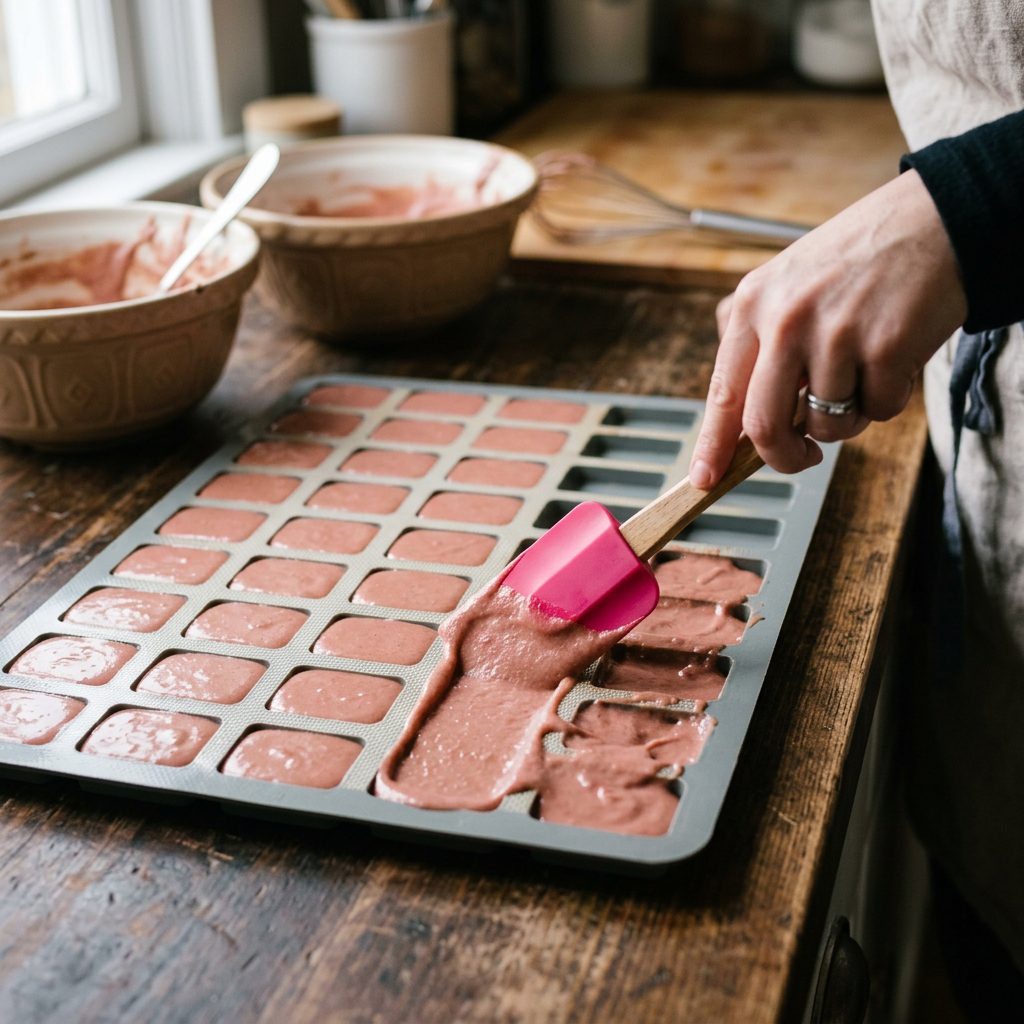
Mastering the Squeegee Technique
This is where the magic happens. If you follow this workflow, you will have your mats in the oven in under 10 minutes. Speed is the name of the game here.
Step 1: Prep the Mats
Place your silicone mats pointy-side down on a large, rimmed baking sheet. This provides stability when you move them to the oven. Pre-heat your oven to 350°F (175°C).
Step 2: The Pour and Squeegee
Pour about half of your blended batter onto the center of the mat. Using a silicone bench scraper or a flat spatula, spread the batter across the surface. Use a firm, ‘squeegee’ motion to push the batter into every single hole. Scrape the excess batter off the flat top surface of the mat—you want the batter in the holes, not on the mat.
Step 3: The Bake
Pop the trays into the oven for 15-20 minutes. You’ll know they are done when the treats start to pull away slightly from the edges of the silicone and feel firm to the touch.
Step 4: The ‘Grand Reveal’
This is the most satisfying part. Take the mat out of the oven, let it cool for 2 minutes, and then simply flip it over and peel it back. Hundreds of tiny treats will come raining down onto your baking sheet like healthy hailstones. No sticking, no cutting, no mess.
Hacker Tip: If the treats feel a bit soft, turn the oven off and let them sit inside for another 10 minutes with the door cracked. This ‘dehydrates’ them slightly, giving them a longer shelf life and a better ‘pocket’ texture.
Batch Cooking & Storage Secrets
Keeping 1,000 Treats Fresh
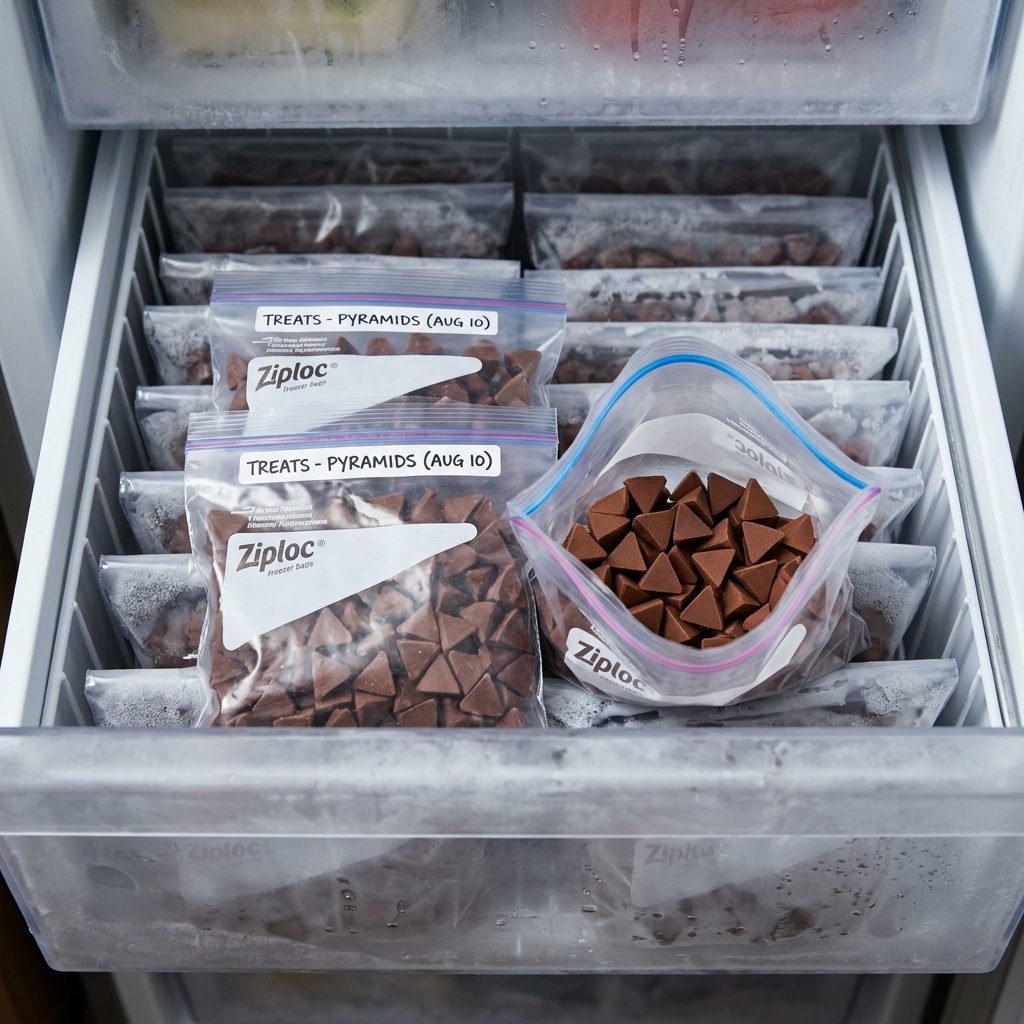
Since we aren’t using chemical preservatives like BHA, BHT, or Ethoxyquin (common in commercial treats), we need to be smart about storage. A batch of 1,000 treats is a lot, even for a high-drive dog.
The 3-Tier Storage Rule
- Tier 1: The Training Pouch (Current Day): Keep a handful in your pouch. They are fine at room temperature for about 6-8 hours.
- Tier 2: The Fridge (The Week’s Supply): Keep about 200 treats in an airtight glass jar in the refrigerator. They will stay fresh for 5-7 days.
- Tier 3: The Freezer (The Reserve): Portion the remaining 800 treats into small freezer bags (about 100-200 per bag). They freeze perfectly and don’t stick together. Just grab a bag the night before you need it and thaw it in the fridge.
By freezing in small portions, you ensure that the treats are always ‘fresh-from-the-kitchen’ quality. Plus, if you’re using a high-value protein like liver, freezing locks in that scent that dogs find irresistible.
Cost Breakdown of the Batch
Let’s look at what you just saved by spending 10 minutes in the kitchen:
| Ingredient | Cost |
|---|---|
| 2 Cans Tuna | $2.50 |
| 2 Eggs | $0.60 |
| 1/2 Cup Flour/Starch | $0.40 |
| Electricity/Misc | $0.50 |
| Total Cost | $4.00 |
You just made the equivalent of 7 bags of commercial treats. At $10 a bag, that’s $66.00 in savings every time you run this hack. That’s more money for high-quality kibble or that fancy orthopedic bed your dog has been eyeing.
Conclusion
Level Up Your Training Game
There you have it—the ultimate insider secret to winning at the dog ownership game. By using the Baking Sheet Grid Hack, you’ve effectively bypassed the overpriced, filler-laden pet treat industry. You are now providing your dog with human-grade, high-protein rewards that actually fuel their brain and body.
Remember, training is as much about the relationship as it is about the behavior. When you show up with treats that smell like real meat and fish (because they are real meat and fish), your dog’s engagement will skyrocket. You’re no longer just a person with a clicker; you’re the source of the best food they’ve ever had.
So, grab a silicone mat, fire up that blender, and start hacking your dog’s nutrition. Your wallet will be heavier, your dog will be healthier, and your ‘sit-stays’ will be sharper than ever. Happy hacking!