Stop Squishing! The Genius Silicone Spatula Trick For 300 Training Treats In 10 Minutes Flat!
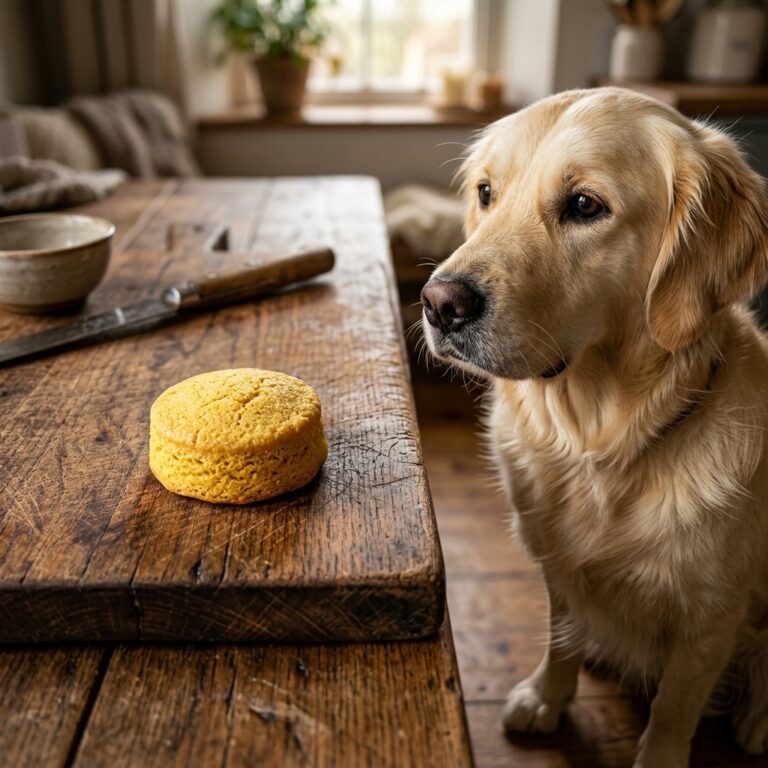
Listen up, savvy dog owners. If you are actively training your dog, you already know the painful truth: training requires a massive amount of treats. We are talking hundreds of repetitions a week. And if you are buying those tiny, high-value training treats from the pet store, you are bleeding money. Worse yet, if you look closely at the ingredient labels of those commercial bags, you will find a horror show of fillers, artificial preservatives, sugar, and mystery meat meals.
As your resident Canine Nutrition Hacker, I refuse to pay $15 for a tiny bag of glorified junk food. But I also refuse to spend three hours on my Sunday rolling out sticky dough and cutting it into microscopic squares with a pizza cutter. Who has time for that? We want premium, single-ingredient-level nutrition for our dogs, but we need it fast, cheap, and easy.
Enter the greatest kitchen hack in the dog training world: The Silicone Spatula Trick. This genius method allows you to churn out 300 perfectly sized, pea-scale training treats in exactly 10 minutes of active prep time. No rolling. No squishing. No sticky fingers. Just pure, high-value reinforcement that will make your dog focus like a laser beam. Let us dive into the hack that is going to save your wallet and upgrade your dog’s health.
The High-Value Treat Dilemma: Cost vs. Quality
Before we get into the kitchen, we need to talk about why we are doing this. In dog training, especially for complex behaviors or reactivity modification, kibble just does not cut it. You need high-value treats. But commercial high-value treats are a massive trap.
Exposing the Commercial Treat Industry
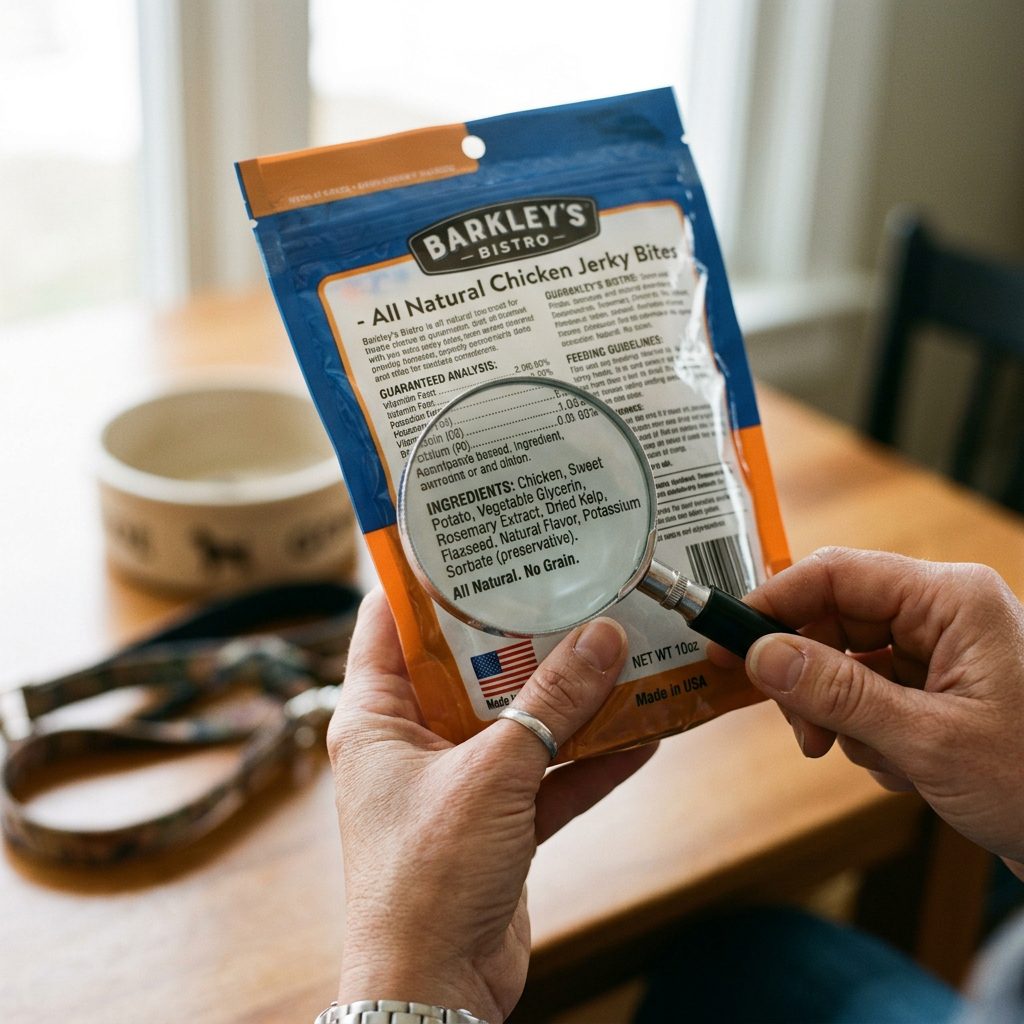
Grab a bag of popular soft training treats and look at the first five ingredients. You will often see things like wheat flour, corn syrup, glycerin, and unspecified poultry fat. Glycerin is used to keep the treats soft and chewy on the shelf for years, but it can cause digestive upset in dogs. Sugar and syrups are added to make them hyper-palatable, which is essentially the canine equivalent of fast food.
The Insider Secret: Commercial treat manufacturers know you want small treats for training, so they charge a premium for the ‘convenience’ of tiny sizes. You are paying a massive markup for air and processing.
Furthermore, when you are delivering 50 to 100 treats in a single agility or obedience session, those junk calories add up fast. You risk your dog gaining weight or developing a sensitive stomach. By taking control of the ingredients, you ensure that every single repetition is fueled by actual nutrition.
The Safe Chef Guide & Real Cost Breakdown
SAFETY DISCLAIMER: I am a Canine Nutrition Hacker, not a veterinarian. While these treats are fantastic for training, they are meant for supplemental feeding only and should not make up more than 10% of your dog’s daily caloric intake. If your dog has specific allergies, swap the proteins accordingly.
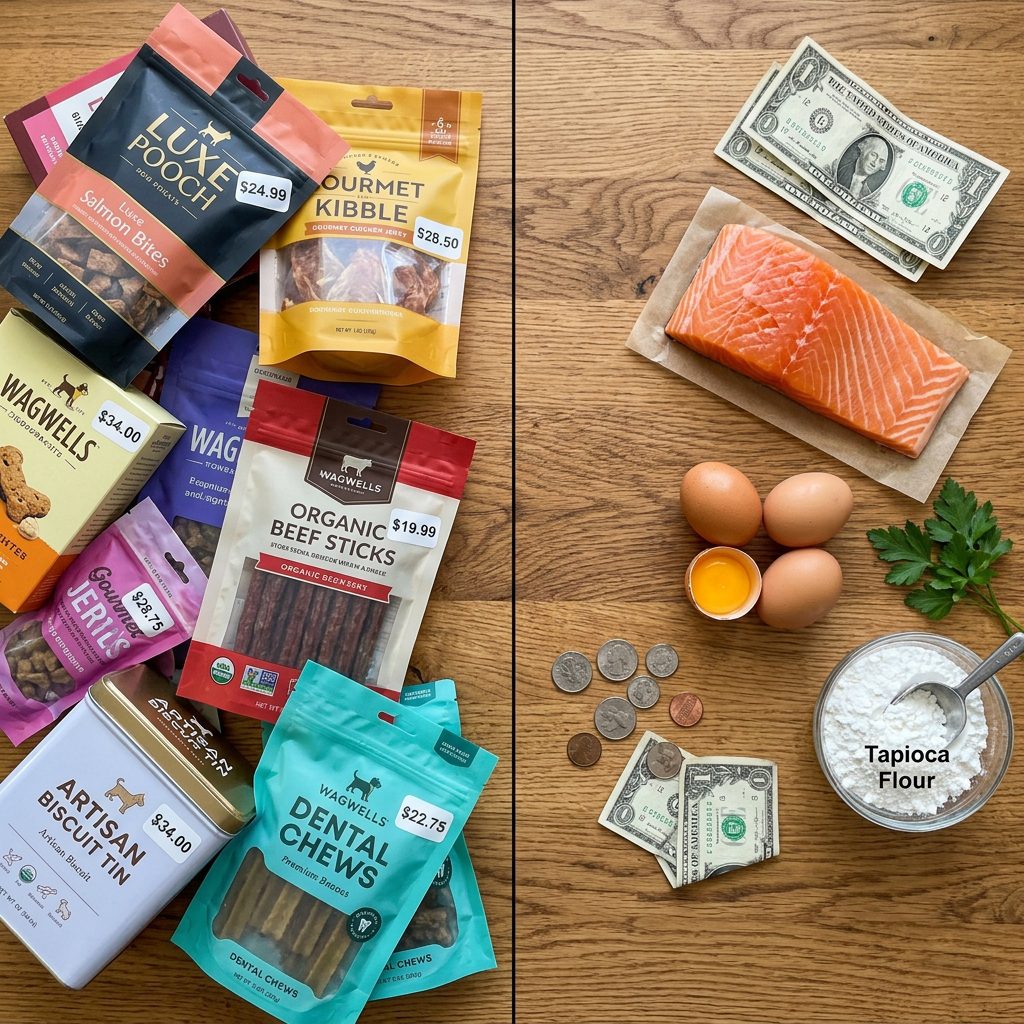
Let us look at the cold, hard math. When I say this hack saves you money, I am not exaggerating. Here is the forensic breakdown of what you are actually spending when you rely on the pet store versus utilizing our silicone spatula hack.
| Treat Type | Primary Ingredients | Cost Per 300 Treats | Time Investment |
|---|---|---|---|
| Store-Bought Premium | Chicken, Glycerin, Sugar, Preservatives | $12.00 – $18.00 | 0 mins (Buying) |
| Traditional DIY (Rolling) | Real Meat, Flour, Egg | $2.50 | 45 – 60 mins |
| The Silicone Hack DIY | Real Meat, Tapioca Flour, Egg | $2.50 | 10 mins flat |
By using this method, you are slashing your costs by over 80% while simultaneously upgrading the ingredient profile to human-grade food. Over the course of a year of active training, this hack alone can save you hundreds of dollars.
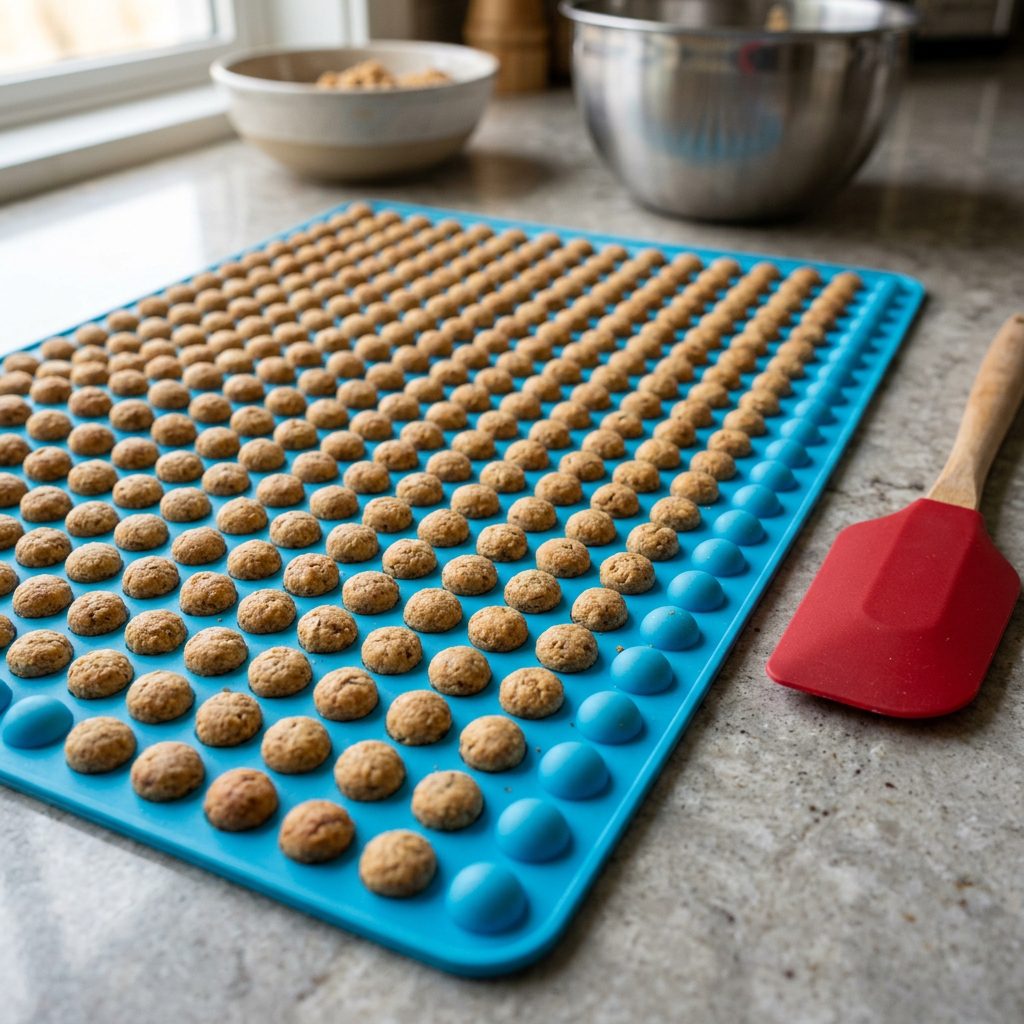
The Anatomy of the Silicone Spatula Trick
So, what exactly is this magical trick? It all revolves around two simple pieces of kitchen equipment: a silicone baking mat with tiny cavities (often sold as a ‘pyramid pan’ used for fat-draining, or a specific mini-dot dog treat mold) and a standard silicone baking spatula.
The Gear You Need
- The Mold: You want a food-grade silicone mat that has hundreds of tiny, half-sphere or pyramid indentations. The cavities should be about the size of a pea or a small blueberry. This is the absolute perfect size for rapid-fire training rewards.
- The Spatula: A firm but flexible silicone spatula or a bowl scraper.
- A Blender: A standard blender or food processor to puree your batter.
The Mechanics of the Hack
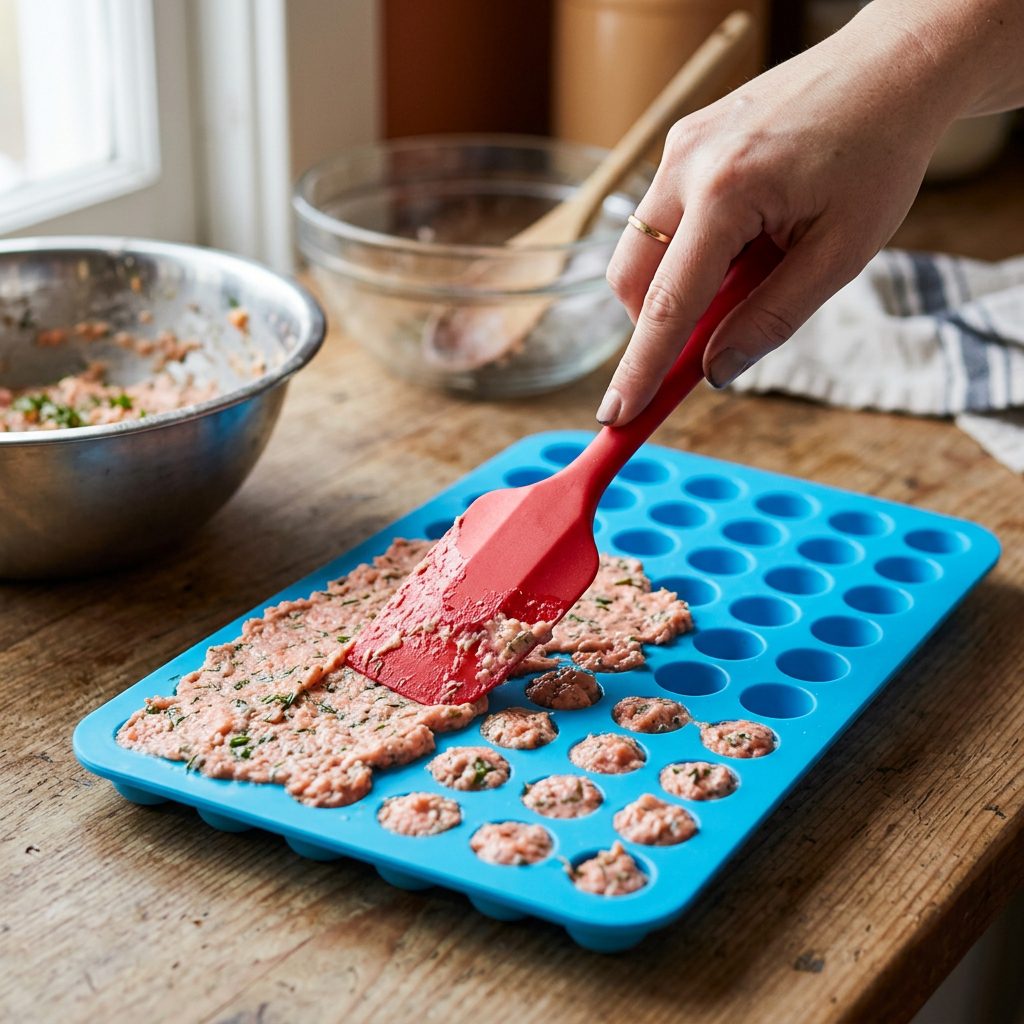
The old way of making treats involves making a dough, which requires exact moisture levels so it does not stick to your hands. The hacker way bypasses dough entirely. We are making a thick liquid batter. You place your silicone mold on a baking sheet. You pour the batter directly into the center of the mold. Then, using your silicone spatula, you simply squeegee the batter across the surface.
The spatula forces the batter down into the hundreds of tiny cavities while scraping the top layer completely clean. In about 30 seconds of spreading, you have perfectly filled 300 tiny treat molds. No rolling. No cutting. Just squeegee, bake, and pop them out.
Hacker Tip: Do not over-fill the top of the mat. You want the flat surface of the silicone mat to be mostly clean so the treats bake as individual little dots rather than a connected sheet of matrix.
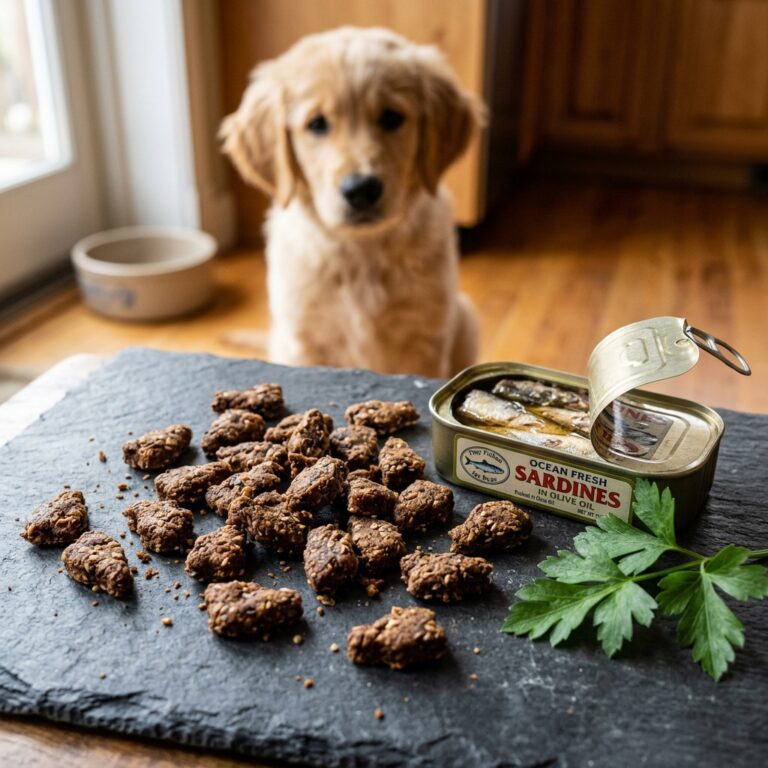
The 10-Minute Hacker Recipe: High-Value Salmon Dots

This is my go-to recipe. It is incredibly stinky (which dogs love), highly nutritious, and achieves the exact right consistency for the squeegee method. Salmon provides excellent Omega-3 fatty acids for brain health and coat shine, making these treats both a training tool and a health supplement.
The 3-Ingredient Formula
- 1 Can of Pink Salmon (approx. 14oz): Do not drain the water! We need that moisture for the batter. You can also substitute this with a can of tuna in water or 1 cup of raw beef liver.
- 2 Pasture-Raised Eggs: This acts as our primary binder.
- 1 Cup of Tapioca Flour (or Oat Flour): Tapioca flour creates a wonderful, slightly chewy texture that holds together brilliantly without crumbling in your pocket. It is also grain-free and highly digestible.
Step-by-Step Instructions
- Preheat: Fire up your oven to 350 degrees Fahrenheit (175 degrees Celsius). Place your silicone mold on a sturdy baking sheet.
- Blend: Dump the entire can of salmon (water included), the two eggs, and the flour into your blender or food processor. Blend on high until it forms a completely smooth, thick liquid. It should look like thick pancake batter.
- The Squeegee: Pour the batter onto the center of your silicone mold. Take your spatula and firmly spread the mixture outwards, pushing it into the holes. Scrape the excess off the top.
- Bake: Pop the baking sheet into the oven for 12 to 15 minutes. You will know they are done when they shrink slightly away from the edges of the molds.
- The Pop-Out: Remove from the oven and let cool for 5 minutes. Now for the best part: simply invert the silicone mat and gently bend it. Hundreds of perfect, tiny treats will rain down onto your counter.
Troubleshooting the Batter Consistency
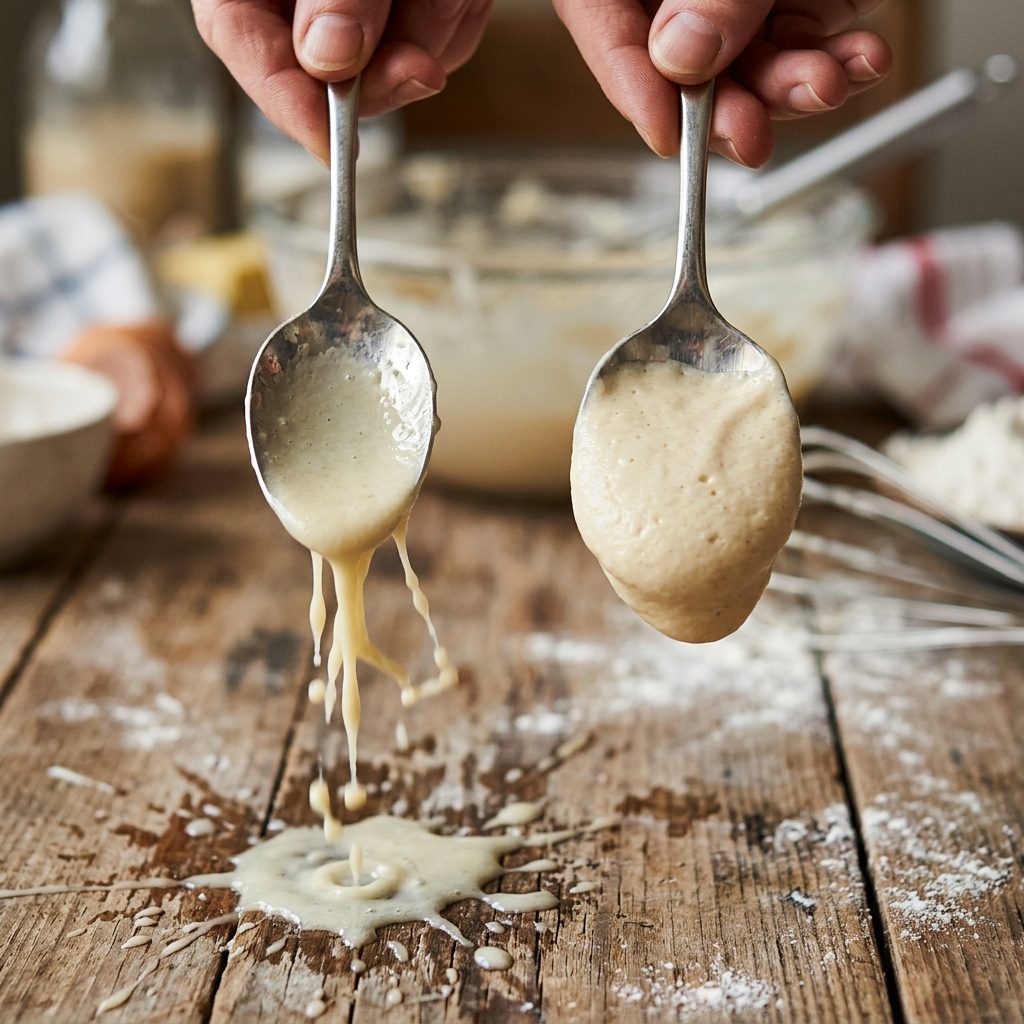
The secret to this hack is getting the batter consistency right. Because different flours absorb moisture differently, and egg sizes vary, you might need to make micro-adjustments in the kitchen. Here is how to read your batter like a pro.
If the Batter is Too Thick
If your batter is clumping up and refusing to spread smoothly into the tiny cavities, it is too thick. It will stick to your spatula rather than settling into the mold. The Fix: Add a tablespoon of water or low-sodium bone broth to the blender and pulse it. Repeat until it reaches that smooth, pourable pancake-batter texture.
If the Batter is Too Thin
If the batter is watery, it will fill the holes easily, but it will boil over in the oven and take forever to bake, resulting in a mushy treat that spoils quickly. The Fix: Add more tapioca or oat flour, one tablespoon at a time, until the batter thickens up. You want it to have enough body to hold its shape once pushed into the mold.
Batch Cooking & The Secrets to Perfect Storage
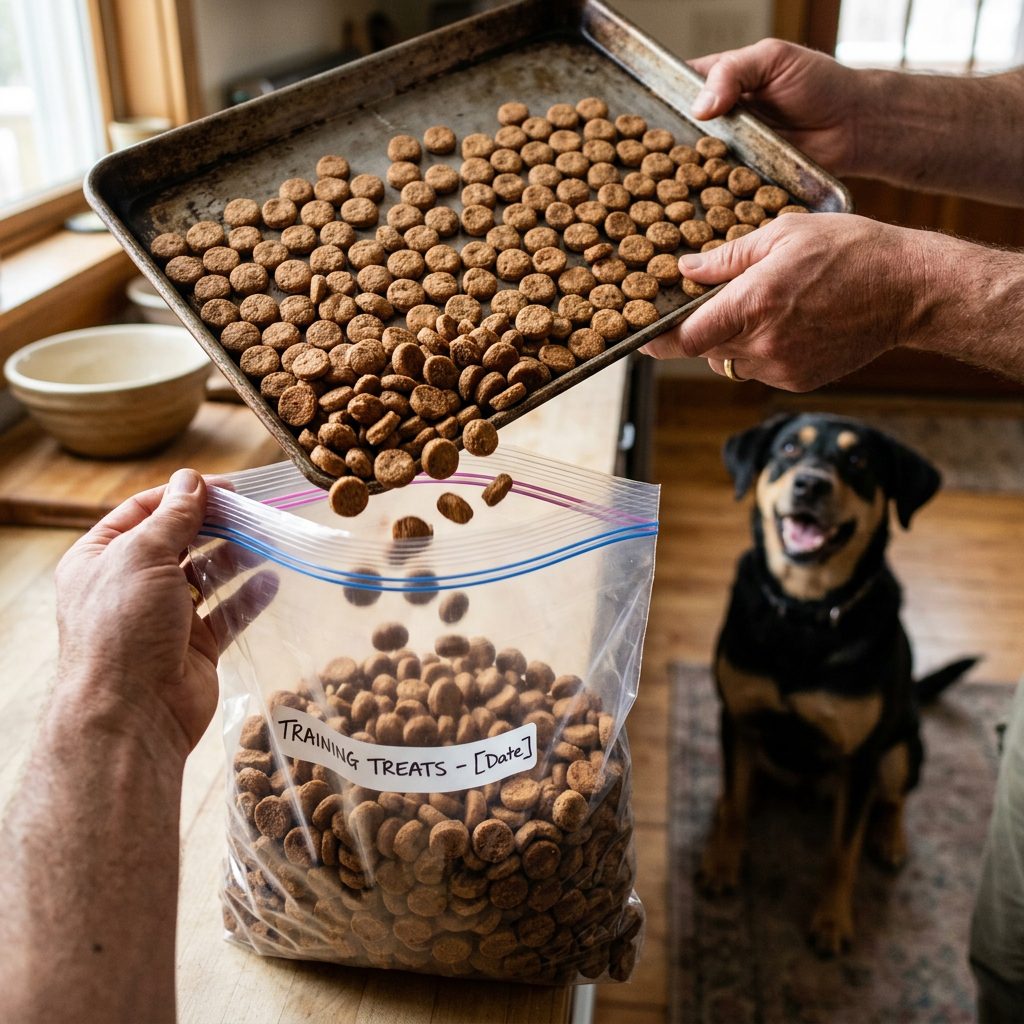
Because this method is so fast, I highly recommend batching. I usually do three mats at a time, yielding nearly 1,000 treats in under an hour. But because we are using fresh ingredients with absolutely zero artificial preservatives (no gross glycerin here!), storage is critical.
The Fridge vs. Freezer Strategy
These treats contain real meat and egg, meaning they have a shelf life similar to human leftovers. Do not leave them in your training pouch overnight on the counter!
- Short-Term Storage (The Fridge): Place the treats you plan to use within the next 3 to 4 days in an airtight container in the refrigerator. The cold actually helps firm up the tapioca flour, making them even less crumbly in your pocket.
- Long-Term Storage (The Freezer): Take the remaining hundreds of treats, lay them flat on a baking sheet, and freeze them for an hour. Once they are frozen individually, transfer them to a heavy-duty Ziploc bag. This prevents them from clumping together into a giant ice block. They will last in the freezer for up to 3 months.
Hacker Tip: You do not even need to thaw them before training! Because they are so tiny, they thaw in your pocket within minutes, or your dog will happily crunch them frozen. Frozen treats are especially great for teething puppies!
By mastering this silicone spatula trick, you are not just saving money; you are taking absolute control over your dog’s nutrition. You are removing the fillers, eliminating the junk, and providing a high-value reward that actually builds a healthier, more focused dog.
Conclusion
There you have it—the ultimate Canine Nutrition Hacker secret to endless, budget-friendly, high-value training treats. The silicone spatula trick is a total game-changer for anyone serious about dog training. No more sticky fingers, no more wasted Sunday afternoons, and most importantly, no more feeding your dog overpriced commercial garbage filled with sugar and preservatives.
By investing in a simple silicone mini-mold and using ingredients you probably already have in your pantry, you can churn out 300 perfect treats in just 10 minutes. Your wallet will thank you, your training sessions will become sharper, and your dog will go absolutely crazy for the fresh, real-meat taste. So grab your spatula, fire up the oven, and start hacking your dog’s nutrition today. Happy training!