The 4-Ingredient Sourdough Discard Dog Donuts Your Pup Will Go Crazy For
The Secret Gold in Your Kitchen Sink
If you have been following the sourdough trend, you know the heartbreak of the ‘discard.’ Every time you feed that starter, you are literally pouring potential down the drain. But as The Canine Nutrition Hacker, I do not see waste—I see a nutritional goldmine. Most ‘artisanal’ dog treats you find at boutique pet stores are nothing more than overpriced flour, sugar, and glycerin wrapped in fancy packaging. They charge you $15 for a bag that costs them forty cents to produce. We are ending that today.
Sourdough discard is not just a filler; it is a fermented powerhouse. While you should never feed your dog raw dough (more on that in a second), the baked version of sourdough offers unique benefits. The fermentation process breaks down complex starches and phytic acid, making the nutrients more bioavailable for your pup. In this guide, I am going to show you how to take four simple ingredients and turn them into the highest-value reward your dog has ever tasted. We are talking about treats that make them sit, stay, and practically do your taxes. Let’s get into the science, the safety, and the savings.
The Safe Chef Guide: Is Sourdough Actually Safe for Dogs?
Safety First: The ‘Hacker’ Disclaimer
Before we preheat the oven, let’s get the legal and medical stuff out of the way. I am not a veterinarian; I am a nutrition hacker who obsesses over ingredient labels and canine physiology. This recipe is intended as a treat, not a meal replacement. Treats should never exceed 10% of your dog’s daily caloric intake.
The Raw Truth About Yeast
You must understand one non-negotiable rule: Never feed your dog raw sourdough starter or raw dough. Raw yeast dough expands in the warm environment of a dog’s stomach, which can cause life-threatening gastric torsion (bloat) and alcohol poisoning as the yeast ferments. However, once that dough is fully baked into these donuts, the yeast is neutralized, the alcohol is evaporated, and you are left with a safe, crunchy, and delicious snack.
Why Sourdough?
Standard store-bought biscuits are often loaded with ‘corn gluten meal’ and ‘wheat middlings.’ Sourdough, on the other hand, undergoes a long fermentation. This process reduces the gluten content and neutralizes anti-nutrients. For dogs with mild grain sensitivities, sourdough can often be easier on the gut than standard processed wheat. It is essentially a prebiotic-rich vehicle for flavor.
The Economic Reality: DIY vs. Store-Bought
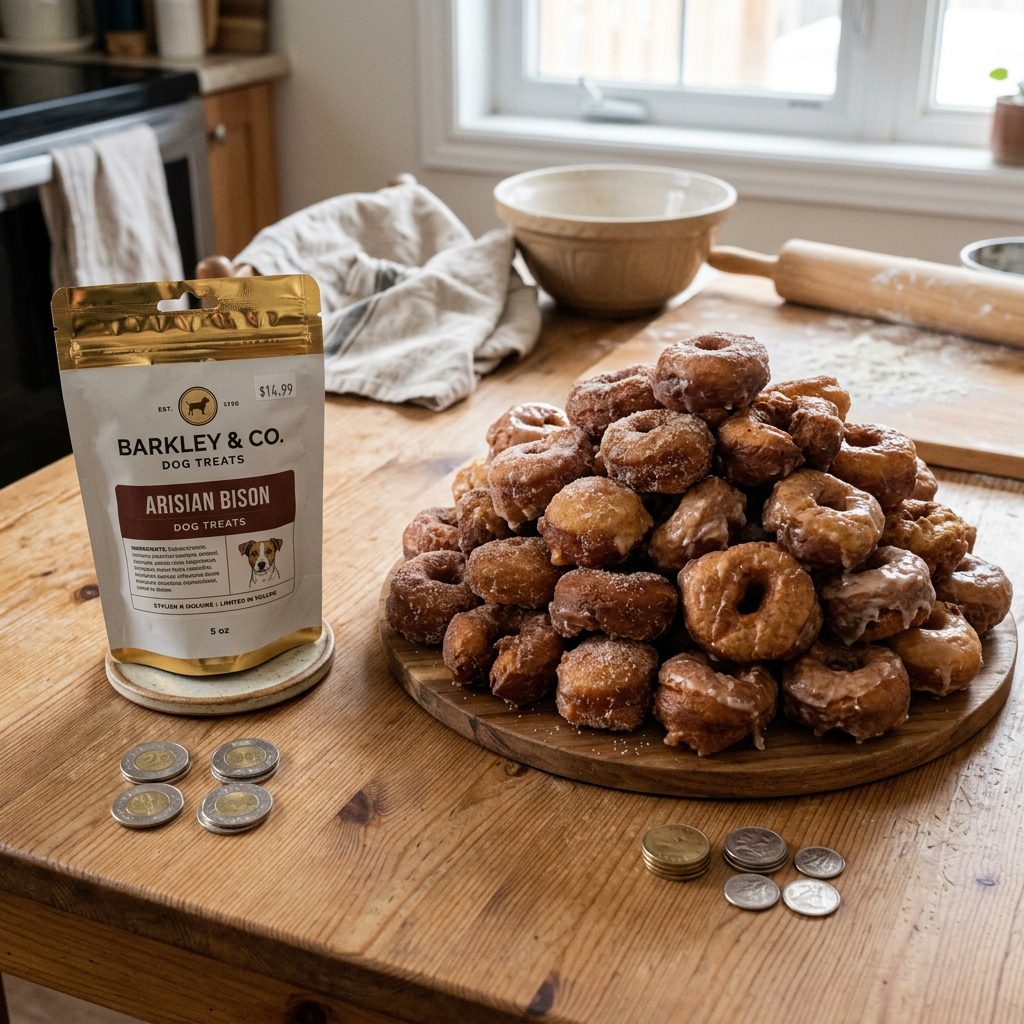
Exposing the ‘Gourmet’ Markup
The pet industry wants you to believe that ‘healthy’ must mean ‘expensive.’ They use buzzwords like ‘small-batch’ and ‘human-grade’ to justify a 400% markup. Let’s look at the cold, hard numbers. When you use sourdough discard, you are using a byproduct you’ve already paid for. Add in an egg, some peanut butter, and a bit of flour, and your cost per batch is negligible.
| Feature | Store-Bought ‘Artisan’ Treats | Hacker’s Sourdough Donuts |
|---|---|---|
| Price per 8oz Bag | $14.99 – $18.99 | $0.65 |
| Primary Ingredient | Wheat Flour or Glycerin | Fermented Sourdough Discard |
| Preservatives | Potassium Sorbate / Mixed Tocopherols | None (Freshly Baked) |
| Bioavailability | Low (Highly Processed) | High (Fermentation-Aided) |
| Verdict | Overpriced Convenience | The Smart Owner’s Choice |
By switching to this DIY method, a savvy owner of a 50lb dog can save upwards of $300 a year on high-value treats alone. That is money that could go toward a better primary protein source or a rainy-day vet fund.
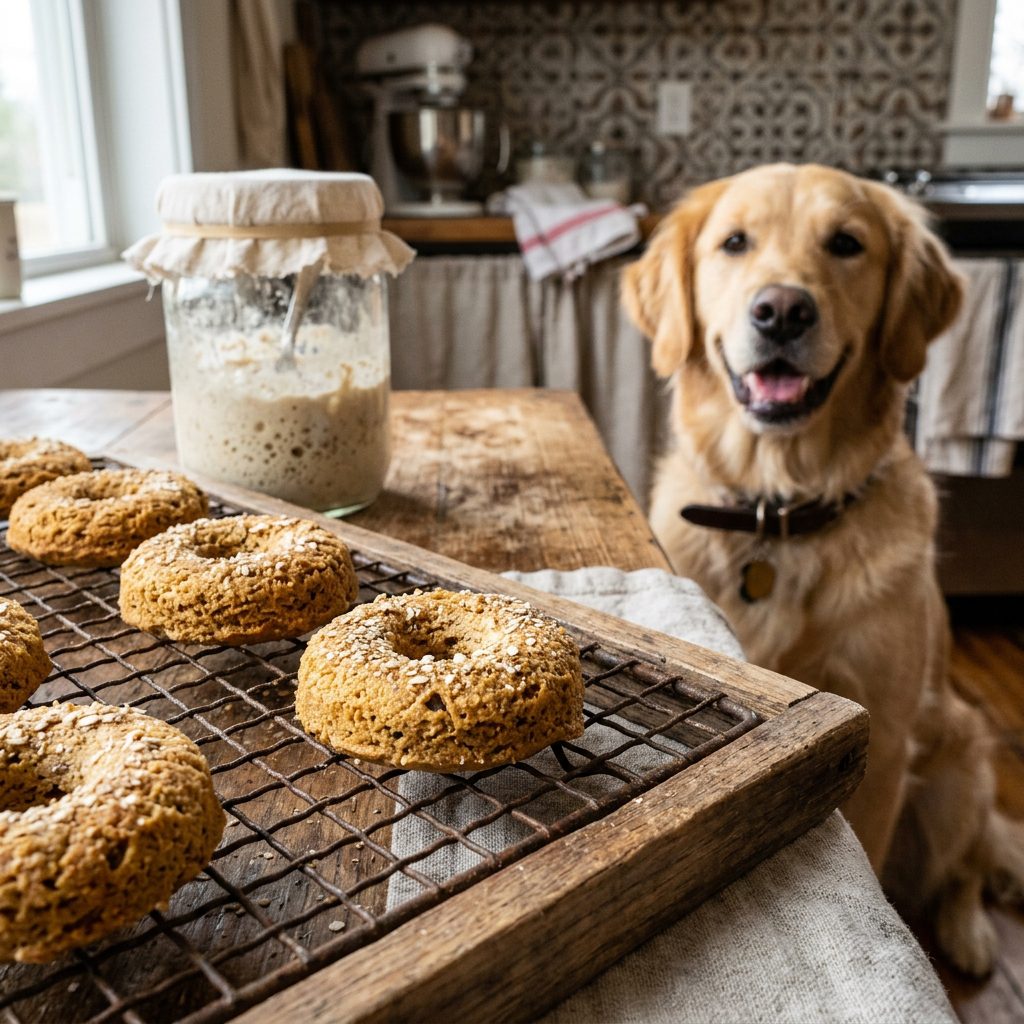
The 4-Ingredient Master Recipe
The Actionable Blueprint
This recipe is designed for maximum efficiency. No rolling pins, no complicated cutters—just a donut pan (or a mini-muffin tin) and ten minutes of prep time. Here is the ‘First 5’… well, in this case, the only 4 ingredients you need.
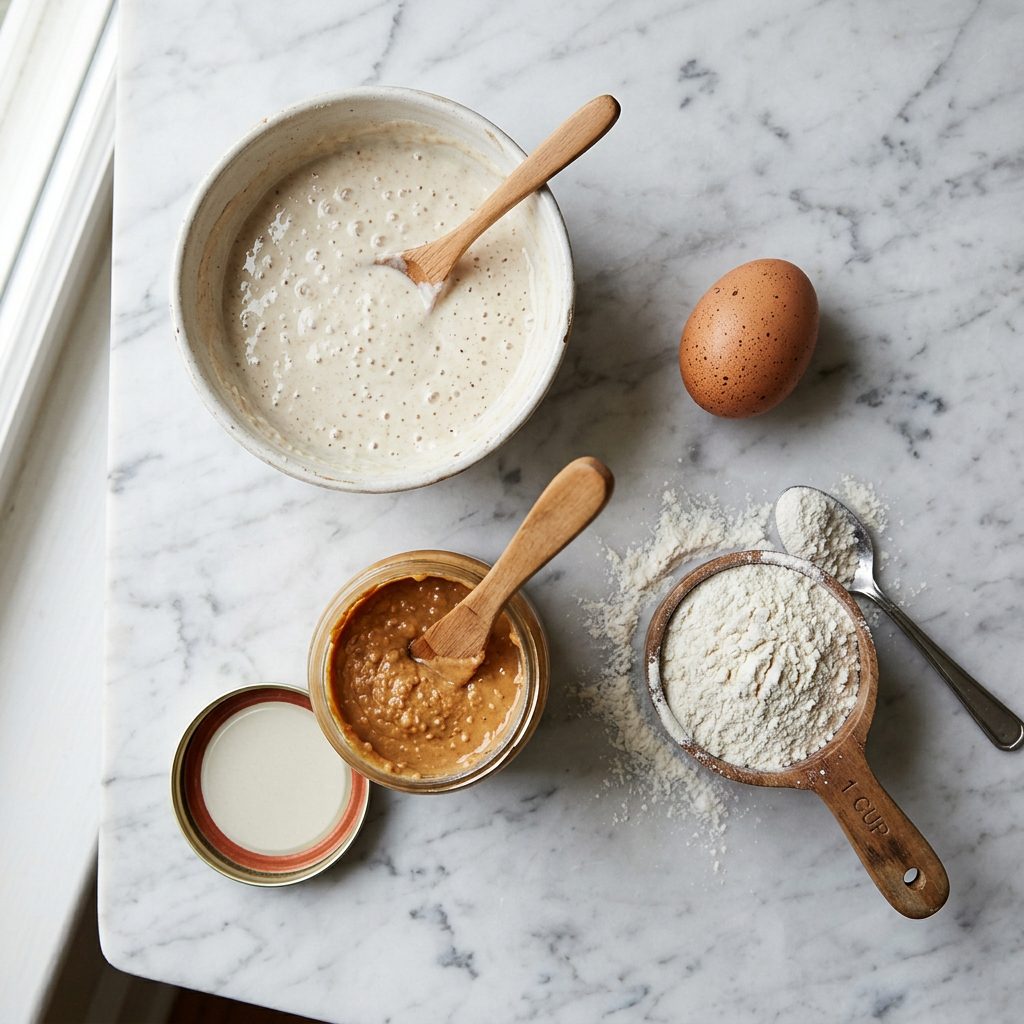
- 1 Cup Sourdough Discard: The fermented base (unfed is fine).
- 1/2 Cup All-Natural Peanut Butter: WARNING: Ensure it contains ZERO Xylitol (Birch Sugar). Xylitol is deadly to dogs. Check the label twice.
- 1 Large Egg: The binder that provides essential amino acids and choline.
- 1 to 1.5 Cups Flour: You can use Whole Wheat for fiber, or Oat Flour if your dog is sensitive to wheat.
Step-by-Step Instructions
- Preheat: Set your oven to 350°F (175°C). Lightly grease a silicone donut mold with a tiny bit of coconut oil.
- Mix: In a large bowl, whisk the egg and peanut butter until smooth. Stir in the sourdough discard.
- Incorporate: Slowly add the flour. You want a dough that is tacky but manageable, similar to play-dough. If it is too wet, add more flour.
- Fill: Press the dough into the donut molds. Since these don’t ‘rise’ much in the oven, you can fill them to the top.
- Bake: Bake for 20-25 minutes. If you want them ‘hacker-crunchy’ (which is better for dental health), turn the oven off and let them sit inside for another 30 minutes to dehydrate.
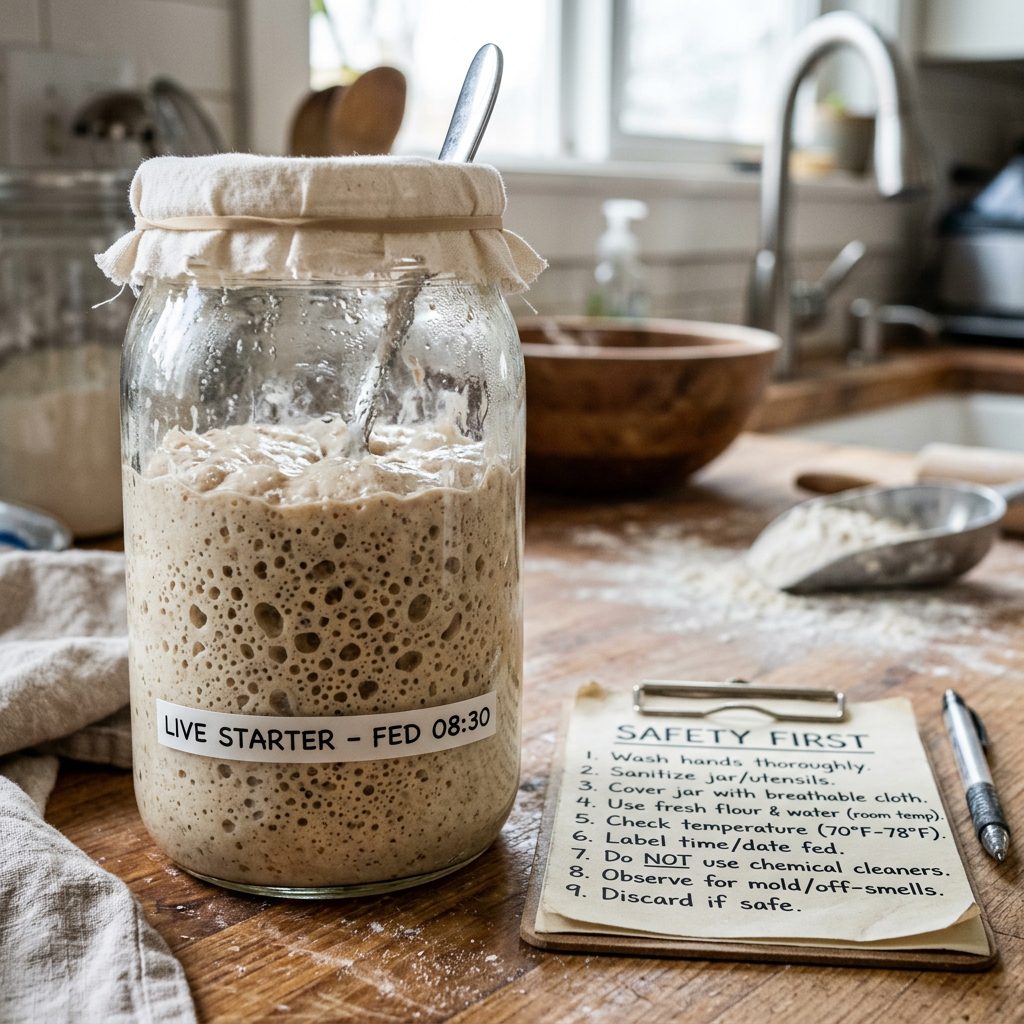
The Hacker’s Guide to Storage and Batch Cooking
Maximize Your Time, Preserve the Quality
I don’t have time to bake every day, and neither do you. The key to being a nutrition hacker is batch cooking. These donuts do not contain the chemical preservatives (like BHA or BHT) found in commercial kibble, so you need to handle them correctly to prevent mold.
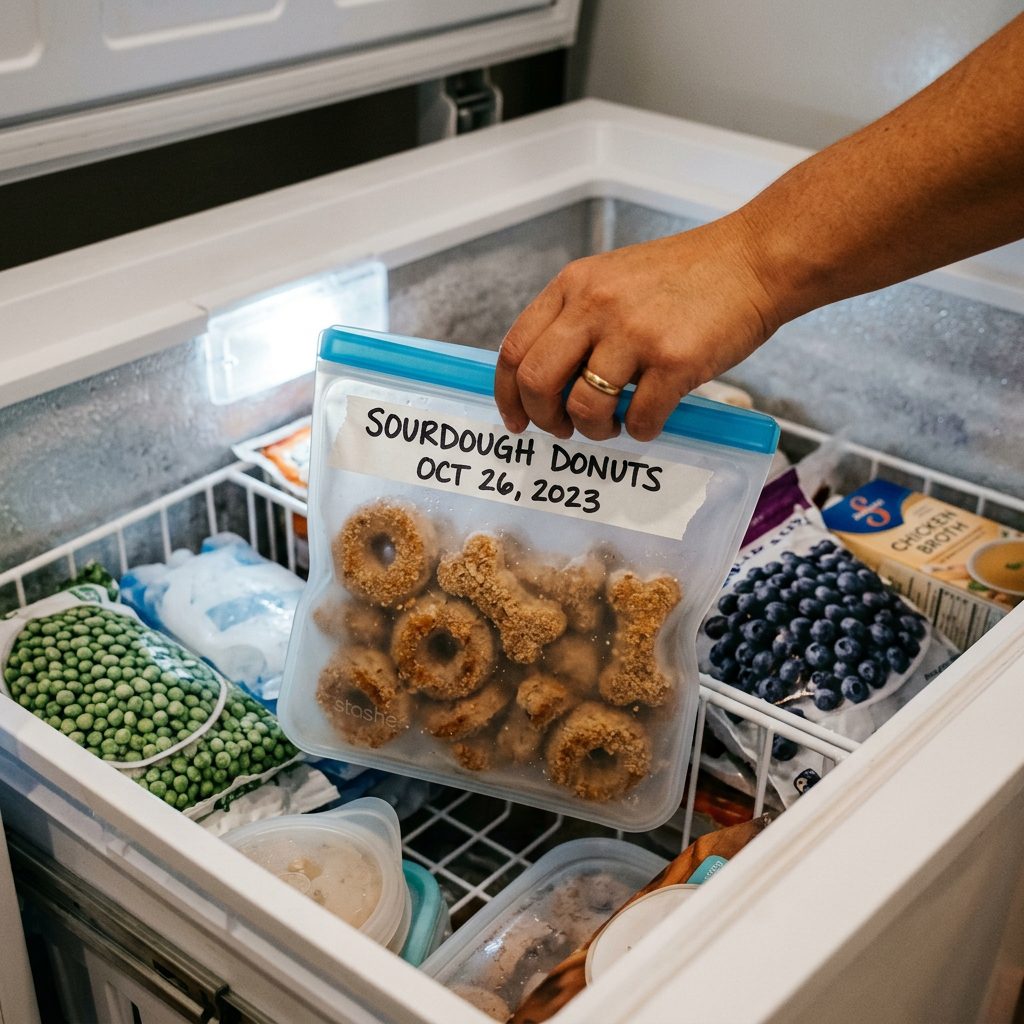
The Freezer Strategy
Because these treats have moisture from the peanut butter and discard, they will only last about 5 days in an airtight container on the counter. However, they are perfect for freezing. I recommend baking a double or triple batch once a month. Flash-freeze them on a baking sheet for an hour before tossing them into a silicone freezer bag. They can be served frozen (great for teething puppies!) or thawed for 10 minutes.
Insider Secret: If you want these to last 6 months on the shelf, use a dehydrator after baking. Set it to 150°F for 4 hours until they are rock hard. This removes the ‘water activity’ that bacteria need to grow.
The ‘Extra’ Dog Owner Add-ins
Once you master the base recipe, you can hack the nutrition further. Try adding a tablespoon of ground flaxseed for Omega-3s, or a teaspoon of turmeric (with a pinch of black pepper) for its anti-inflammatory properties. Just remember: keep the additions small so you don’t mess up the dough consistency.
Troubleshooting and Texture Tips

Don’t Panic: Fixing Common Mistakes
Every sourdough starter has a different hydration level. If your discard is ‘runny,’ your dough will be a mess. If your discard is ‘stiff,’ your donuts might crumble. Here is how to pivot like a pro.
- Too Sticky: If the dough sticks to your hands, add flour 1 tablespoon at a time. The goal is a texture that pulls away from the sides of the bowl.
- Too Dry: If the dough is cracking, add a teaspoon of water or unsalted chicken broth.
- The ‘Donut’ Hack: If you don’t own a donut pan, don’t go buy one. Just roll the dough into small balls and flatten them with a fork. Your dog doesn’t care about the shape; they care about the ‘stink’ (the delicious fermented aroma).
Remember, the crunch factor is your friend. Harder treats help mechanically scrape a small amount of plaque from the teeth. If your dog is a senior with dental issues, bake them for the minimum time (18 minutes) to keep them soft and chewy.
Conclusion
Empower Your Pup’s Palate
You have just graduated from being a passive consumer to a Canine Nutrition Hacker. By using these 4-ingredient sourdough discard donuts, you are cutting out the middleman, eliminating toxic fillers, and providing your dog with a treat that actually supports their gut health. You are saving money and, more importantly, you know exactly what is going into your best friend’s body. No more ‘mystery meat’ byproducts or hidden sugars. Just pure, fermented goodness. Now, go give your dog a donut—they’ve earned it, and so have you.