No More Car Vomit: The Easy Ginger and Honey Treats to Cure Your Dog’s Motion Sickness
The Nightmare of Canine Car Sickness
Let us be completely real for a second. There is absolutely nothing worse than cruising down the highway, your favorite playlist on the radio, your dog supposedly relaxing in the back seat, only to hear that dreaded, rhythmic heaving sound. You know the sound. It is the soundtrack to your impending doom. Next thing you know, you are frantically pulling over onto the narrow shoulder of a busy interstate, desperately searching your glovebox for fast-food napkins, and trying to clean up a massive puddle of dog vomit from your expensive car upholstery. If you have a dog that suffers from car sickness, you know exactly what I am talking about. It turns fun family road trips into high-anxiety nightmares and makes even a quick five-minute drive to the local vet clinic an absolute logistical disaster. You end up putting down layers of old towels, restricting your dog’s food for hours, and driving like you are transporting fragile explosives. It is exhausting for you, and it is miserable for your best friend.
The Expensive, Chemical-Laden Trap
Naturally, as a desperate dog owner, you probably went straight to the big-box pet store or your vet’s office looking for a miracle cure. And what did you find? A wall of highly processed ‘calming’ chews, expensive anti-nausea pharmaceuticals, and over-the-counter remedies that cost a small fortune. But here is the insider secret the commercial pet industry does not want you to know: you do not need to spend fifty dollars on chemical-laden pills or highly processed commercial treats filled with questionable binders, artificial preservatives, and cheap fillers. As your resident Canine Nutrition Hacker, I am here to tell you that you are likely being ripped off. When you flip those expensive packages around and read the labels like a forensic scientist, you will often find ingredients that have no business being in your dog’s body, let alone a dog with an already upset stomach.
The Natural, Hacker-Approved Solution
The actual cure for your dog’s motion sickness is likely sitting right in your kitchen pantry at this very moment. Today, we are going to dive deep into the ultimate, budget-friendly, highly effective DIY solution: Homemade Ginger and Honey Treats. We are going to bypass the commercial junk, take control of our dogs’ nutrition, and bake up a simple, powerful remedy that utilizes the raw, natural anti-nausea properties of real ginger. SAFETY DISCLAIMER: I am a savvy dog owner, a relentless label reader, and a nutrition hacker, but I am not a veterinarian. While ginger is widely recognized by holistic and traditional vets as safe and highly effective for canine nausea, you must always consult your vet before introducing new foods or remedies. This is especially critical if your dog has underlying health conditions like diabetes, bleeding disorders, a history of gallstones, or if they are pregnant or nursing. Homemade treats are meant for supplemental feeding and remedies, not as a replacement for a complete and balanced diet. Now that we have the legalities out of the way, let us roll up our sleeves and hack your dog’s car sickness for good.
The Science of Doggy Car Sickness (And Why Ginger is the Ultimate Hack)
Understanding the Canine Vestibular System
To truly hack a problem, you have to understand the root cause. Why do dogs, especially puppies, get car sick in the first place? It all comes down to a tiny, complex structure deep inside their inner ear called the vestibular system. This system is responsible for balance and spatial orientation. When your dog is sitting in the back seat of a moving car, their eyes are looking at the static interior of the vehicle—the back of your seat, the floorboards, the ceiling. Their eyes are telling their brain, ‘We are sitting completely still.’ However, their vestibular system is feeling the bumps, the acceleration, the turns, and the braking. It is screaming to the brain, ‘We are moving rapidly in multiple directions!’ This massive sensory disconnect causes a short circuit in the brain, leading directly to the nausea center.
The Puppy Factor
This is why puppies are notoriously prone to car sickness. Their inner ear structures are not fully developed yet. Many dogs will simply outgrow motion sickness as their vestibular system matures, usually by the time they are a year old. But for a significant percentage of dogs, the physical nausea creates a secondary problem: psychological anxiety.
The Anxiety Loop
Here is where it gets tricky. If a dog gets sick in the car a few times, they quickly learn to associate the car with feeling terrible. Even if their inner ear fully develops, the mere sight of the car can trigger a massive release of stress hormones. They start panting, drooling, and pacing before the engine even turns on. The anxiety triggers nausea, and the nausea triggers more anxiety. It is a vicious, self-fulfilling loop.
Enter the Hero: Gingerol
This is where our hero ingredient, ginger, steps into the spotlight. Ginger is not just an old wives’ tale; it is a scientifically proven antiemetic (anti-nausea) powerhouse. The magic lies in the active bioactive compounds found in the ginger root, primarily gingerols and shogaols.
How Ginger Hacks the Gut
When your dog consumes ginger, these compounds go to work directly in the gastrointestinal tract. Unlike pharmaceutical drugs like Dramamine or Cerenia, which work by altering signals in the brain (often leaving your dog groggy or lethargic), ginger works locally in the stomach and intestines. Gingerol helps to speed up gastric emptying—meaning it moves food out of the stomach and into the intestines faster. An empty stomach is much less likely to rebel during a bumpy car ride. Furthermore, ginger acts as a mild muscle relaxant for the smooth muscles of the gut, reducing the spasms that lead to vomiting. It is a targeted, natural, and highly effective hack that leaves your dog alert, happy, and ready for adventure.
The “Hero” vs. “Enemy” Ingredients: Hacking the Label
Exposing the Commercial “Calming” Chews
Before we get to the recipe, we need to talk about why we are making these at home instead of buying them. If you walk down the supplement aisle at a pet store, you will see dozens of products claiming to cure travel anxiety and nausea. But when you apply the ‘First 5 Ingredients Truth’ rule, the facade crumbles.
The Enemy Ingredients
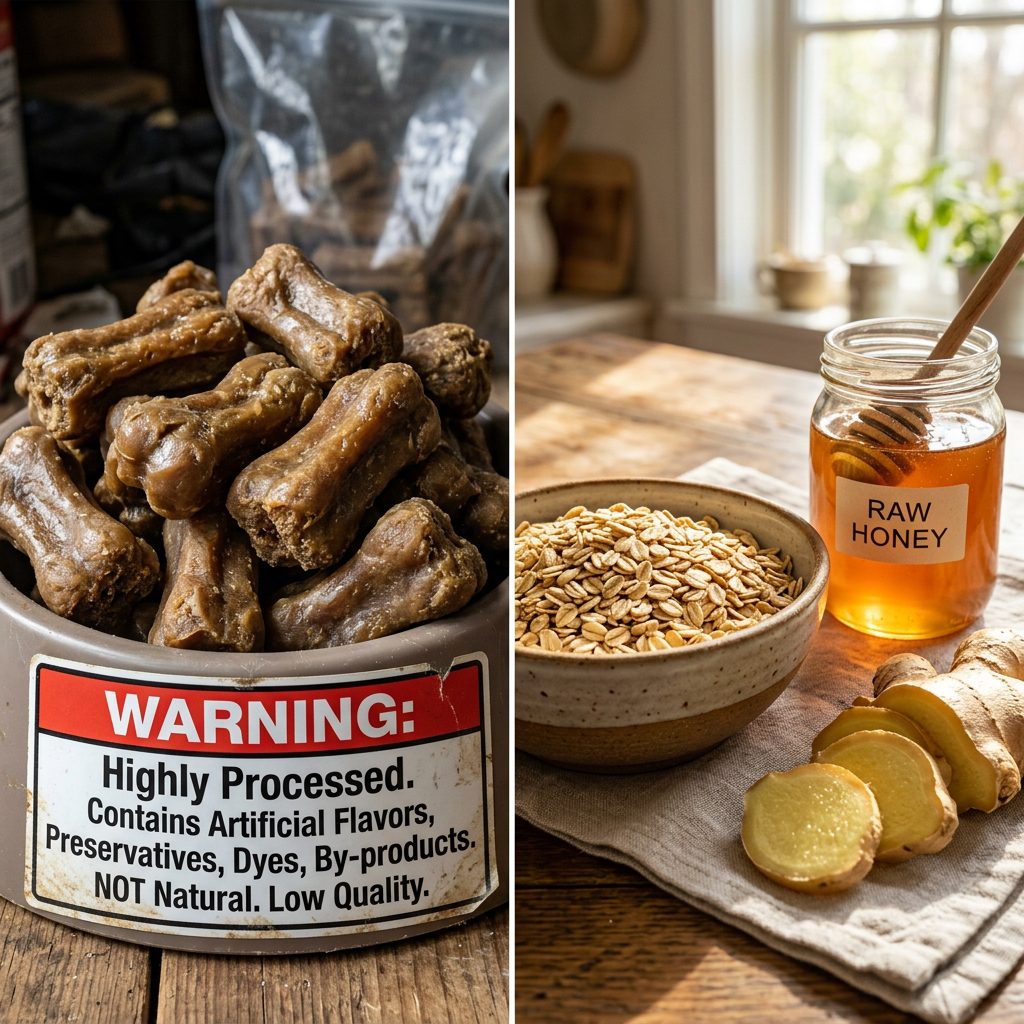
Let us look at a typical, generic, store-bought calming chew. The front of the bag says ‘Made with Real Ginger and Chamomile!’ But when you flip it over, the first five ingredients read: Brewer’s Rice, Corn Gluten Meal, Glycerin, Maltodextrin, and Poultry By-Product Meal. Where is the ginger? It is buried way down at the bottom of the list, right next to the artificial preservatives like BHA, BHT, or Red Dye 40.
- Corn Gluten Meal & Brewer’s Rice: These are cheap, biologically inappropriate fillers. They spike blood sugar and offer zero nutritional value. If your dog already has an upset stomach, feeding them highly processed corn and rice by-products is like throwing gasoline on a fire.
- Glycerin & Maltodextrin: These are sweetening and binding agents used to make the chew soft and palatable. They can cause gastrointestinal distress and diarrhea in sensitive dogs.
- Artificial Preservatives: Ingredients like BHA and BHT are synthetic antioxidants used to extend shelf life. They are known endocrine disruptors and have no place in a healing remedy.
The Safe Chef’s Hero Ingredients
When we take control and DIY, we use 100% functional, whole-food ingredients. Every single item in our recipe serves a specific, healing purpose.
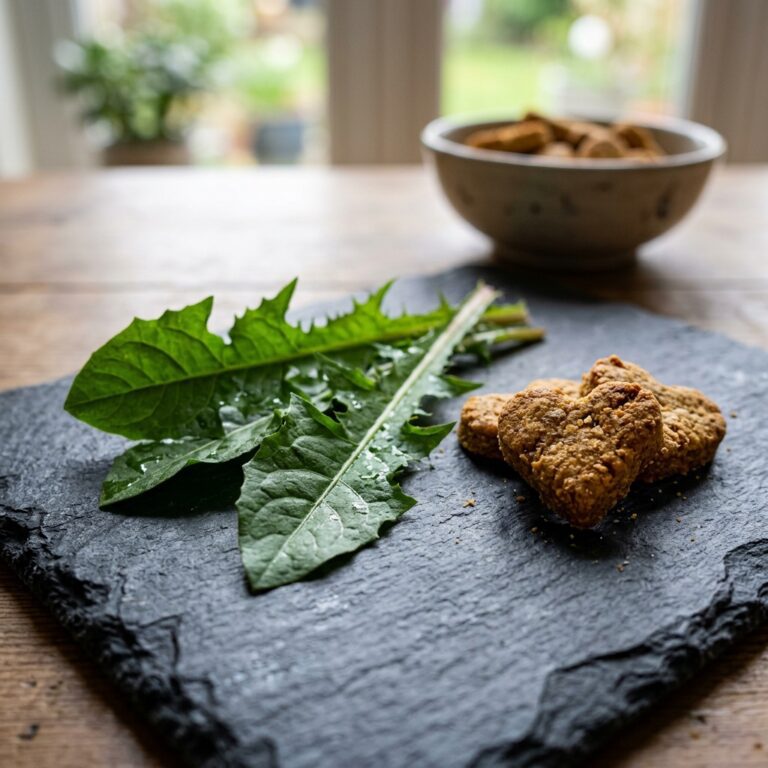
1. Fresh Ginger Root (The Antiemetic)
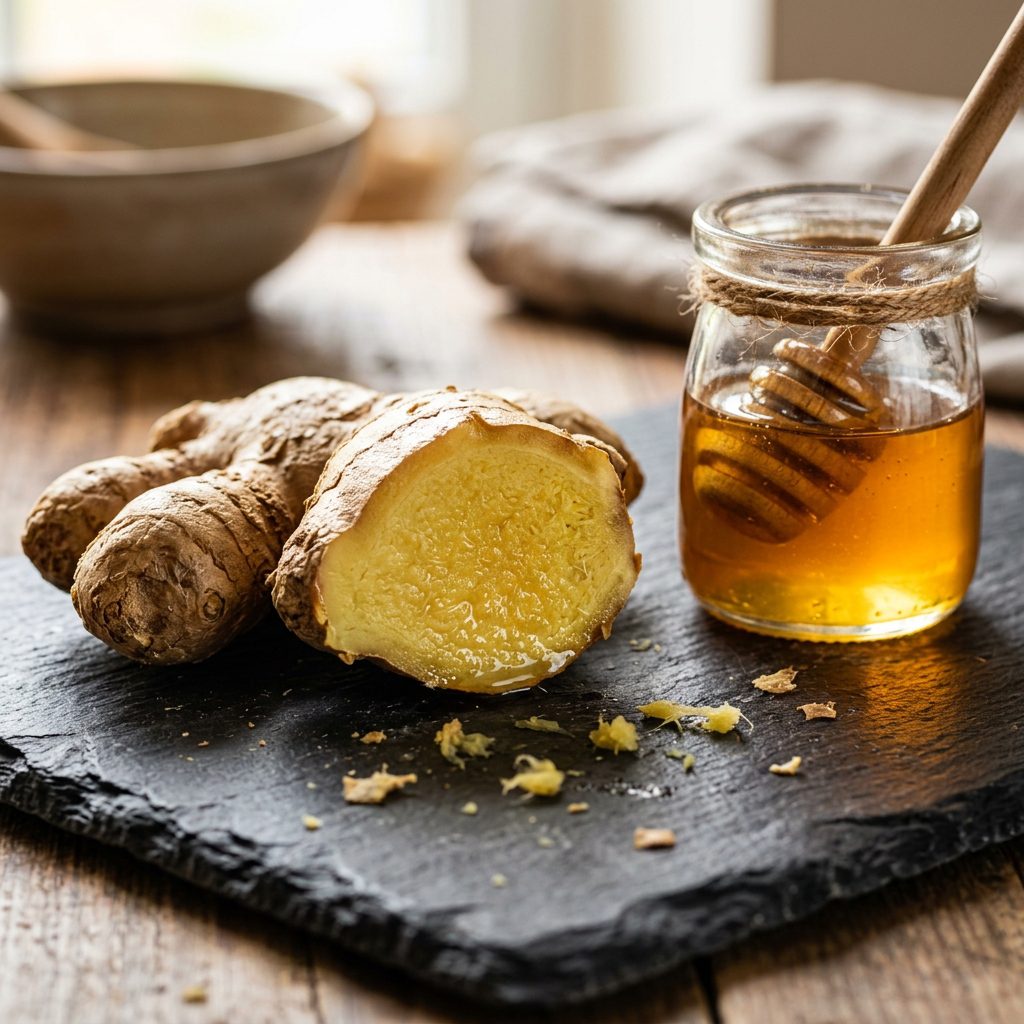
We are using fresh, grated ginger root. Not powdered ginger that has been sitting on a supermarket shelf for three years losing its potency. Fresh ginger contains the highest concentration of active gingerols. It is sharp, pungent, and incredibly effective at soothing the gastric muscles.
2. Raw, Local Honey (The Enzyme Powerhouse)
We are not using the generic, pasteurized honey from the plastic bear bottle. We are using raw, unfiltered honey.
Insider Secret: Raw honey contains natural enzymes like amylase, which actually helps break down carbohydrates and aids in digestion. It also has natural antibacterial properties and provides a gentle, soothing coating to an irritated stomach lining. Plus, it makes the treats highly palatable so your dog will actually want to eat them!
3. Oat Flour (The Gentle Binder)
Instead of cheap wheat or corn, we use oat flour. Oats are naturally gluten-free (if certified) and are incredibly gentle on a dog’s digestive tract. They are a complex carbohydrate that provides a slow, steady release of energy without spiking blood sugar, and they contain soluble fiber which helps regulate bowel movements.
The Safe Chef Guide: Ginger & Honey Motion Sickness Treats Recipe

Preparation and Ratios
Now it is time to put on your apron and become the Canine Nutrition Hacker of your own kitchen. This recipe is incredibly simple, requires minimal prep time, and yields a high-value, functional treat. Yield: Approximately 30-40 small treats (depending on your cookie cutter size).
Prep Time: 15 minutes.
Cook Time: 20-25 minutes.
The Ingredient List
- 1 1/2 cups of Oat Flour: You can buy this pre-milled, or simply take whole rolled oats (not instant) and pulse them in your blender or food processor until they form a fine powder.
- 1 tablespoon of Freshly Grated Ginger: Peel the skin off a fresh ginger root using the edge of a spoon (hacker trick!), and grate it finely. If you absolutely must use powdered ginger in a pinch, use 1 teaspoon, but fresh is vastly superior.
- 2 tablespoons of Raw, Unfiltered Honey: Ensure it is raw to keep the digestive enzymes intact.
- 1/4 cup of Unsweetened Applesauce: Check the label! It must contain ONLY apples. No added sugar, no high fructose corn syrup, and absolutely NO Xylitol (which is highly toxic to dogs).
- 1 tablespoon of Melted Coconut Oil: Provides healthy medium-chain triglycerides (MCTs) and helps bind the dough.
- 1-2 tablespoons of Water: Only as needed to adjust the dough consistency.
The Step-by-Step Baking Process
- Preheat and Prep: Preheat your oven to 325 degrees Fahrenheit (165 degrees Celsius). Line a large baking sheet with parchment paper. Do not use chemical non-stick sprays.
- Mix the Dry Ingredients: In a large mixing bowl, add the oat flour. If you are milling your own oats, make sure there are no large, sharp oat pieces left that could irritate the throat.
- Combine the Wet Ingredients: In a separate, smaller bowl, whisk together the freshly grated ginger, raw honey, unsweetened applesauce, and melted coconut oil until it forms a smooth, fragrant slurry.
- Form the Dough: Pour the wet mixture into the oat flour. Use a spatula or your hands to fold the ingredients together. The dough should be slightly tacky but not overly sticky. If it is too crumbly, add water one teaspoon at a time. If it is too wet, add a sprinkle more oat flour.
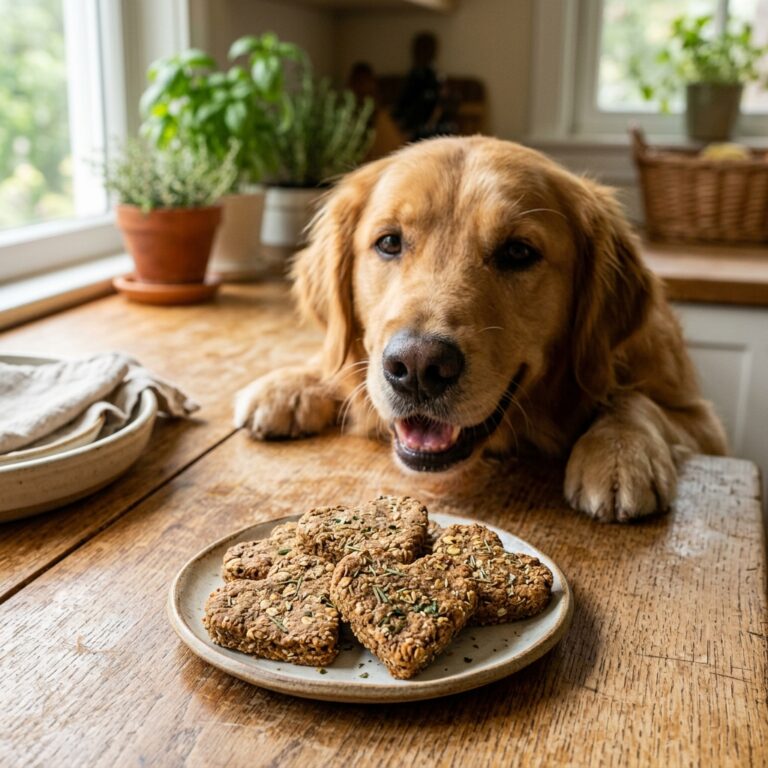
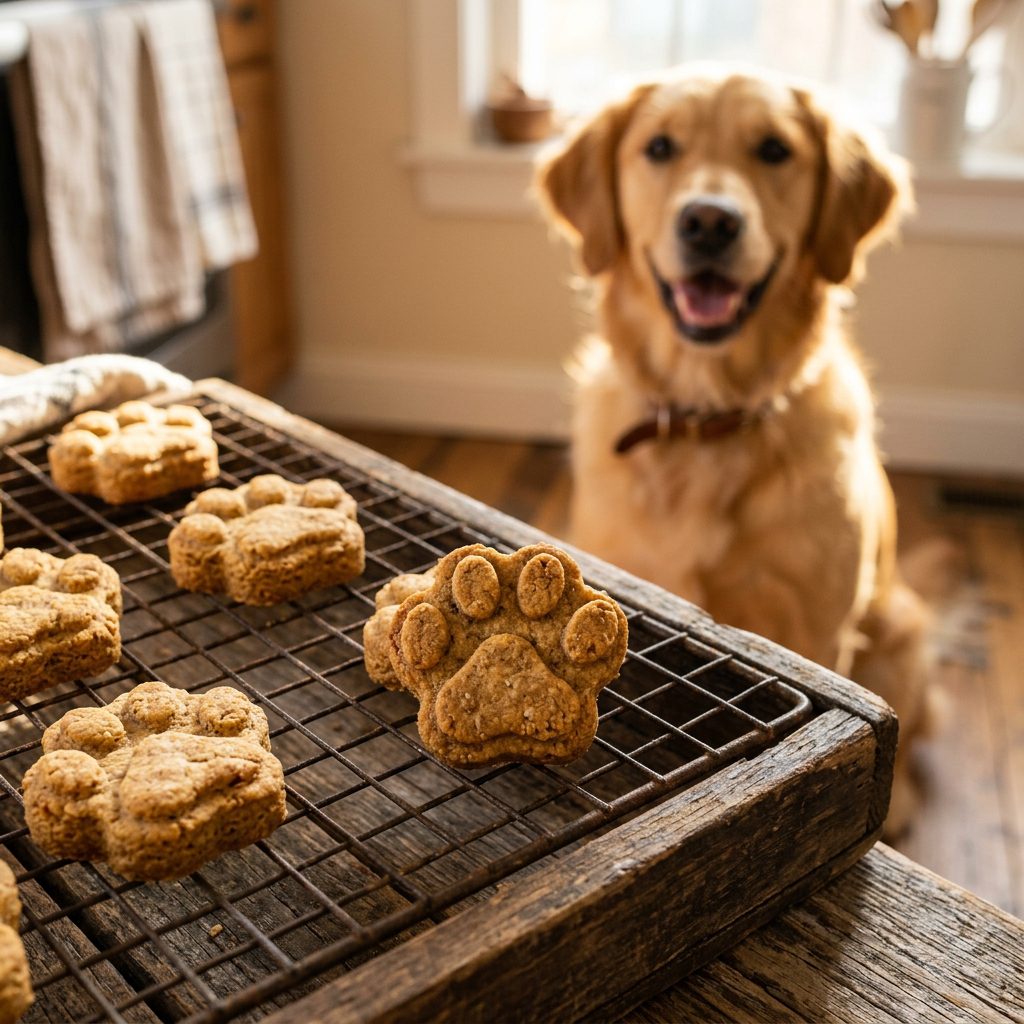
- Roll and Cut: Turn the dough out onto a lightly oat-floured surface. Roll it out to about 1/4 inch thickness. Use a small cookie cutter (a little bone or paw print shape is fun, but a simple square knife cut works just as well) to cut out the treats. Remember, these are medicinal treats; keep them small! A treat the size of a dime or nickel is perfect.
- Bake to Perfection: Place the treats on the parchment-lined baking sheet. They will not expand much, so you can place them fairly close together. Bake for 20 to 25 minutes, or until the edges are a deep golden brown and the treats are firm to the touch.
- The Crucial Cooling Phase: Remove from the oven and let them cool completely on a wire rack. As they cool, they will harden, creating a satisfying crunch that helps clean teeth!
Insider Secret: Batch Cooking! Double this recipe and freeze the raw dough. Roll the dough into a log, wrap it tightly in parchment paper and a freezer-safe bag. The next time you have a road trip coming up, simply slice off a few rounds and bake them fresh!
Real Cost Breakdown: DIY vs. Store-Bought “Calming” Chews
Stop Paying the “Pet Tax”
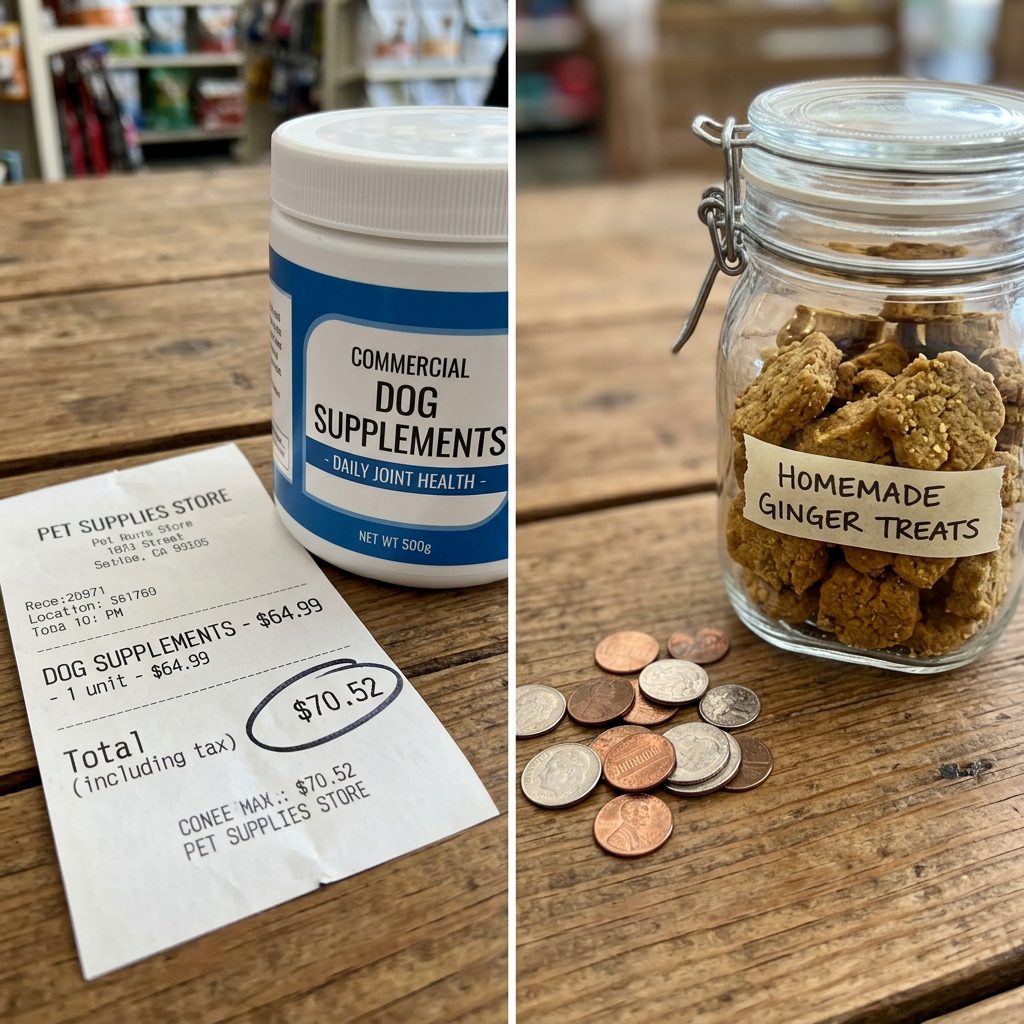
As a savvy dog owner, you know that the moment a product has a picture of a dog on it, the price is marked up by at least 300%. This is known as the ‘Pet Tax.’ When you buy commercial calming or anti-nausea chews, you are paying for marketing, colorful plastic packaging, and massive corporate overhead. Let us do a forensic financial breakdown to see exactly how much money you are saving by hacking this recipe at home. We will base this on a standard 50lb dog taking a remedy before a car ride.
| Metric | Premium Commercial “Calming/Nausea” Chews | DIY Ginger & Honey Treats |
|---|---|---|
| Primary Active Ingredient | Proprietary Blend (Mostly Fillers) | Fresh Ginger Root & Raw Honey |
| Grain Status | Often contains Brewer’s Rice or Corn | 100% Grain-Free / Oat-Based |
| Cost Per Package / Batch | $25.00 – $35.00 (per 30 count jar) | Approx. $3.50 (per 40 count batch) |
| Cost Per Dose (50lb Dog) | $1.75 – $2.50 / ride | $0.17 / ride |
| Preservatives Used | BHA, BHT, Potassium Sorbate | None (Natural Baking & Freezing) |
| The Hacker Verdict | Overpriced, under-dosed, filled with junk. | Highly effective, incredibly cheap, 100% safe. |
The Financial Reality
When you look at the cold, hard numbers, the choice is obvious. A premium jar of commercial chews will run you upwards of thirty dollars. For a 50lb dog, the dosage instructions usually require two to three large chews, bringing your cost per car ride to nearly two dollars. Over a month of trips to the park, the vet, or weekend hikes, that adds up incredibly fast. By utilizing our Safe Chef DIY method, an entire batch of 40 treats costs less than four dollars to make. You are buying a bag of oats, a single ginger root, and utilizing pantry staples. Your cost per dose drops to literal pennies. You are saving over 90% while providing a vastly superior, holistic, and functional product for your dog’s health. That is what being a Canine Nutrition Hacker is all about.
Pro Tips for Feeding, Storage, and Car Desensitization

The Golden Rules of Administration
Having the ultimate ginger treat is only half the battle. How and when you administer it dictates whether you will have a peaceful ride or be reaching for the paper towels.
The 30-Minute Rule
Do not feed your dog these treats as you are backing out of the driveway. Ginger needs time to reach the stomach, begin the process of gastric emptying, and relax the smooth muscles of the digestive tract. Always give your dog their ginger and honey treats exactly 30 to 45 minutes before they step foot in the vehicle. For a small dog (under 20 lbs), one small treat is sufficient. For a medium dog (20-50 lbs), two treats. For a large dog (50+ lbs), three to four treats. *Always start with a smaller dose to see how your dog’s stomach reacts.*
Fasting Before Flights and Drives
Even with the magic of ginger, a full stomach in a moving vehicle is a recipe for disaster. If you are going on a long road trip, withhold their main meal for at least 2 to 3 hours before departure. The ginger treat should be the only thing in their stomach. An empty stomach is a happy stomach on the highway.
Proper Storage for Maximum Potency
Because we are Canine Nutrition Hackers who refuse to use artificial chemical preservatives, these treats will not last for three years on a shelf like the commercial junk.
- Countertop: Store in an airtight glass mason jar in a cool, dark place for up to 5 days. Ensure they are completely cooled before sealing to prevent condensation and mold.
- Refrigerator: Keep them in an airtight container in the fridge for up to 2 weeks.
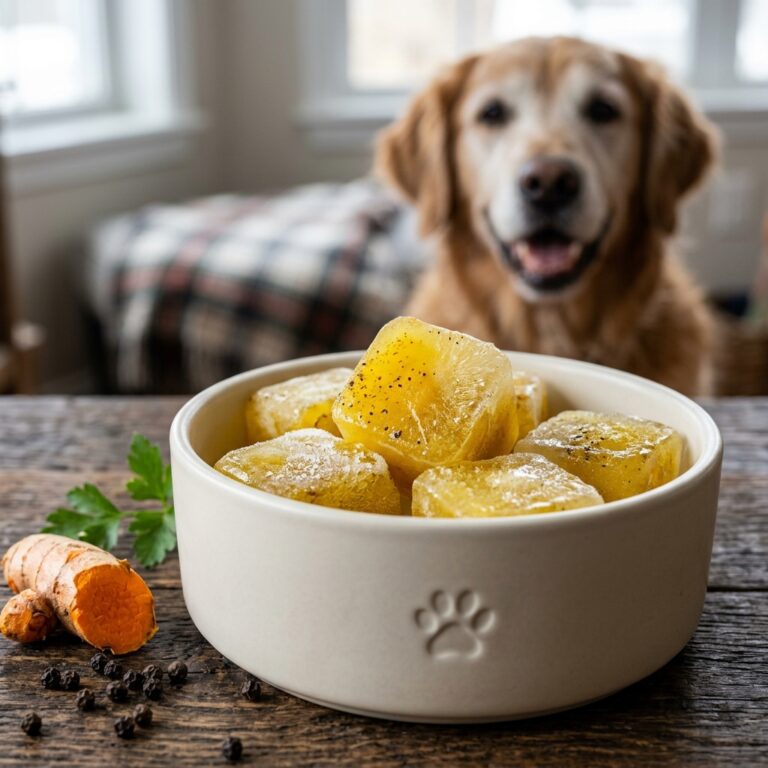
- Freezer: For long-term storage, freeze the baked treats in a ziplock bag for up to 3 months. You can actually feed them frozen! The cold temperature is extra soothing on a dog’s stomach, much like an ice chip is for a nauseous human.
Hacking the Psychological Anxiety
As we discussed in the science section, physical nausea often breeds psychological anxiety. If your dog is terrified of the car, the ginger will cure the stomach, but you must cure the mind.
Counter-Conditioning the Car
You need to break the negative association. Start by simply walking your dog to the car, giving them a high-value ginger treat, and walking away. Do not even open the door. Do this for a few days. Next, open the door, let them jump in, give a treat, and let them jump right back out. No engine. No driving. Eventually, turn the engine on while they eat the treat, then turn it off. Finally, take a 60-second drive down the street and back. By pairing the highly palatable, stomach-soothing ginger and honey treat with tiny, non-threatening micro-exposures to the car, you will completely rewire your dog’s brain. The car will transform from a torture chamber into the magical box that dispenses delicious honey cookies.
Conclusion
Hit the Road with Confidence
Dealing with a dog that suffers from motion sickness is incredibly stressful, but you are no longer at the mercy of expensive, highly processed commercial supplements. By understanding the science of the canine vestibular system, exposing the cheap fillers in store-bought products, and utilizing the natural, holistic power of fresh ginger root and raw honey, you have successfully hacked your dog’s health. These DIY Ginger and Honey treats are cheap to make, completely safe, and most importantly, they actually work. So preheat that oven, grate some fresh ginger, and get ready to reclaim your road trips. No more paper towels, no more anxiety, and absolutely no more car vomit. Just you, your best friend, and the open road. Happy travels, and happy hacking!